Forms
Features and capabilities of the Forms extension
Welcome to Forms, the Monterosa solution for your data capture needs. Forms is a powerful form builder and secure data storage extension that allows you to create custom forms and store data.
Forms supports use cases including competitions, lead generation, or user generated content submissions.
The interface makes it easy for you to build custom forms that can be seamlessly integrated into your apps. You can customise your forms by adding your logo, choosing from a variety of themes, and adding form fields of your choice. Once your form is ready, you can securely store all your data in one place.
How to setup and use the Forms Extension
To set up the Forms extension, follow these steps:
Ensure that Forms is enabled for your Project. If it is not, email support@monterosa.co to create a support ticket and enable the Forms extension.
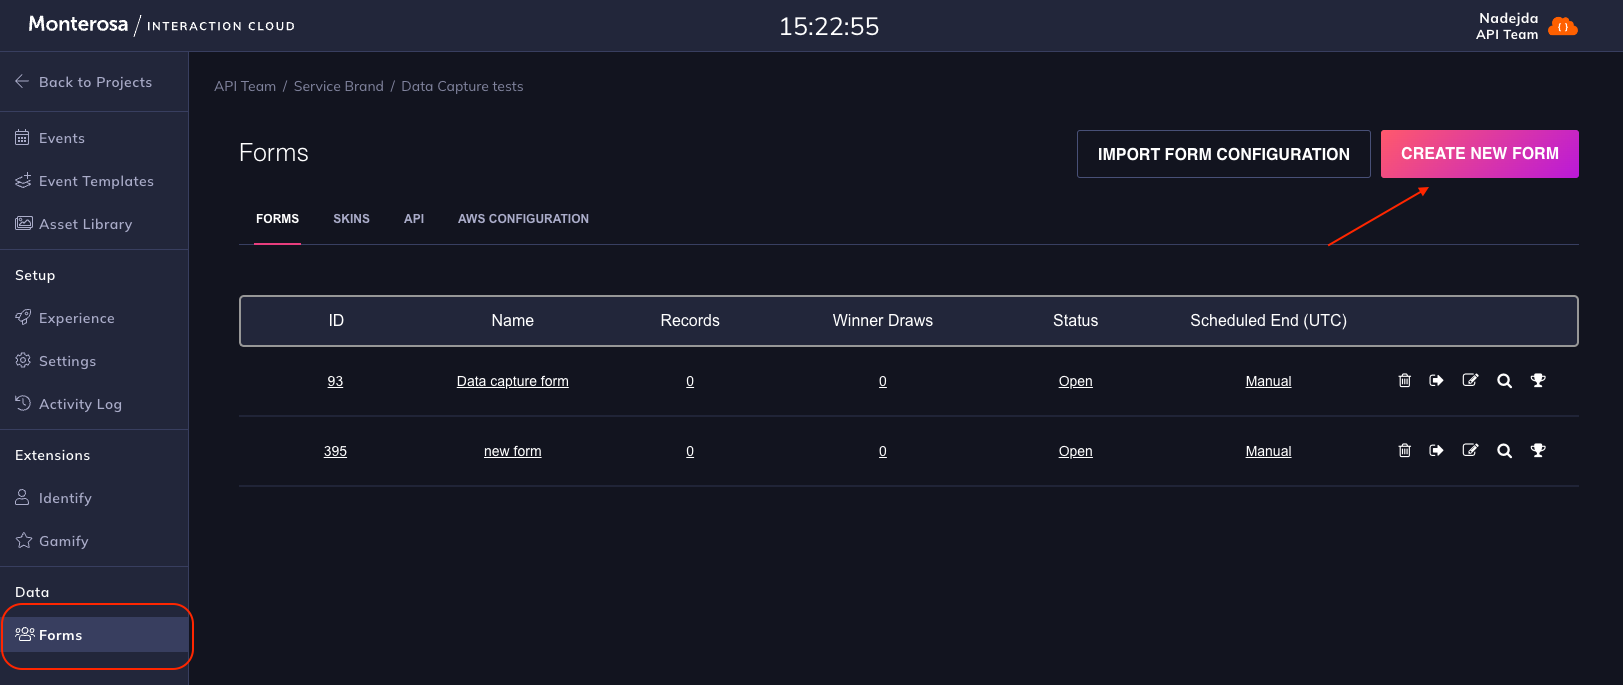
If you are creating a new form, click on "CREATE NEW FORM" on the Forms tab in your Project. Give the form a name.
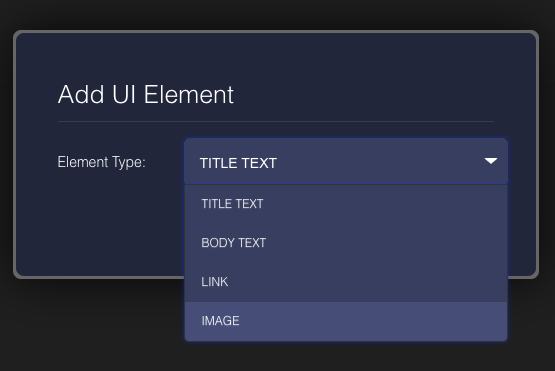
Populate the content of your form under the Header and Form tabs. Add UI elements like Input Text, Drop Down Lists, Radio Buttons, Images, Postcodes, etc. You can also add validation to these fields, like mandatory or optional fields, email format, only numbers, postcode with a custom format, etc. Validation for any field can be extended to any format using Regex. You can also configure each field to accept unique values.
Setup the "Thanks for Voting" screen and "Submission is closed" screen, if desired.
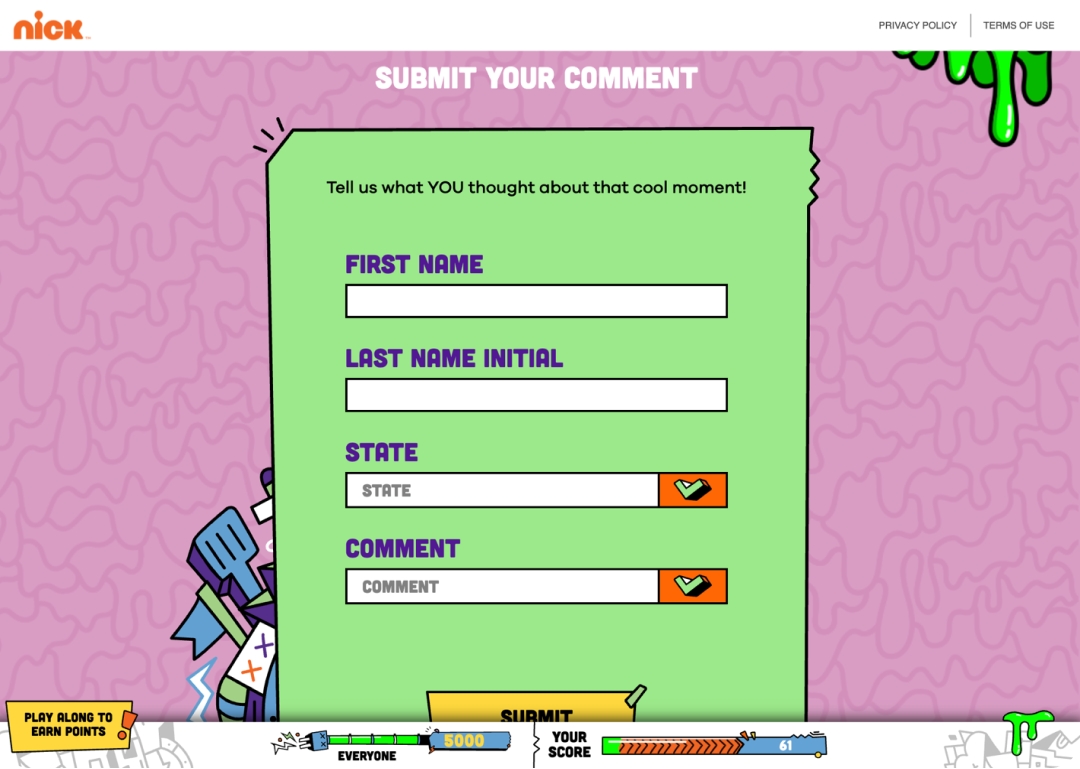
Add custom CSS and JS to add some style to the form. This is known as Skin, which can be assigned to a submission form. Here are some examples:
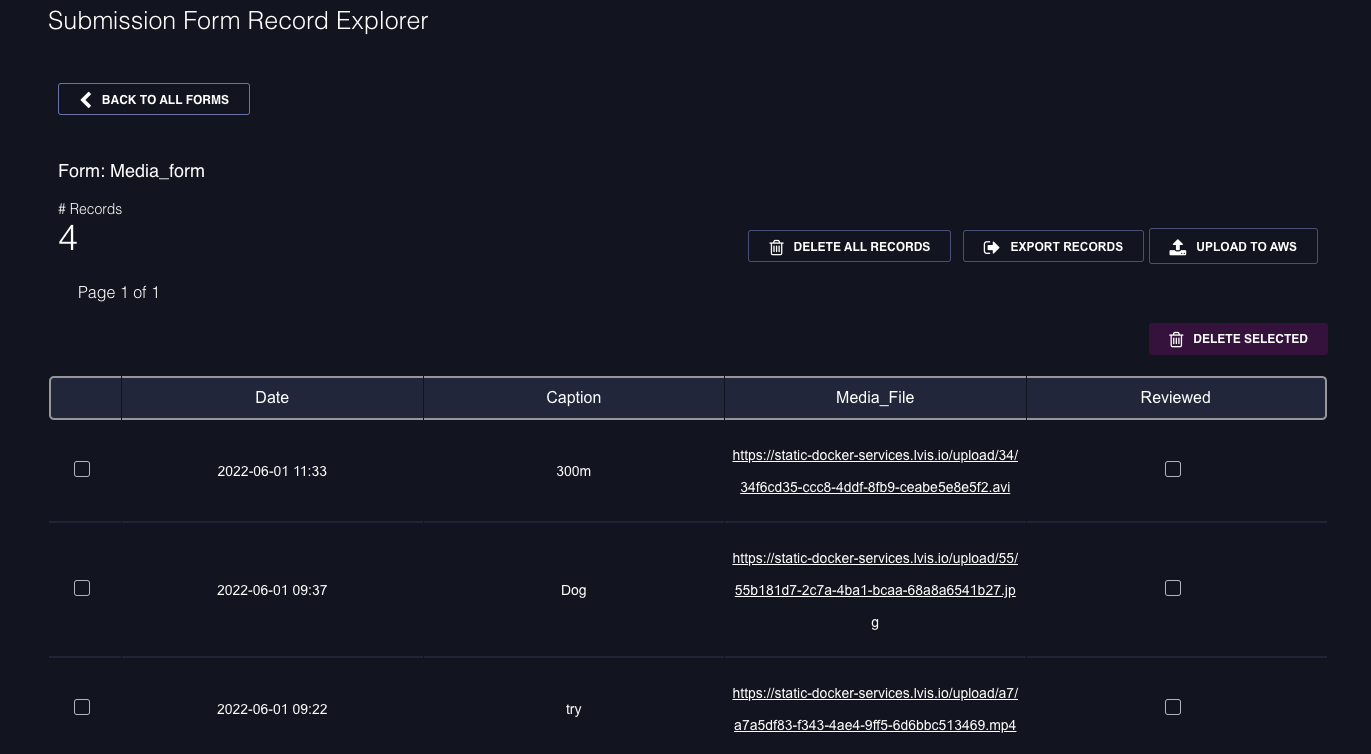
Publish the form within the event to allow users to vote and submit results. You can view the results online by clicking on "View Records".
Set up the trigger for the form. You can trigger the form when the app loads, when the user passes a specified points threshold, before entering the app, when the user answers a question correctly, or when the user participates in a poll or rating. The form can also be manually triggered by the producer.
Display the list of forms as a list on a separate tab in the app, if desired.
Configure and use several different forms per Project. For example, one form can be displayed for users who scored 100pts, and another for users who scored 200pts.
Schedule the forms to automatically close at a set date and time, or close them manually
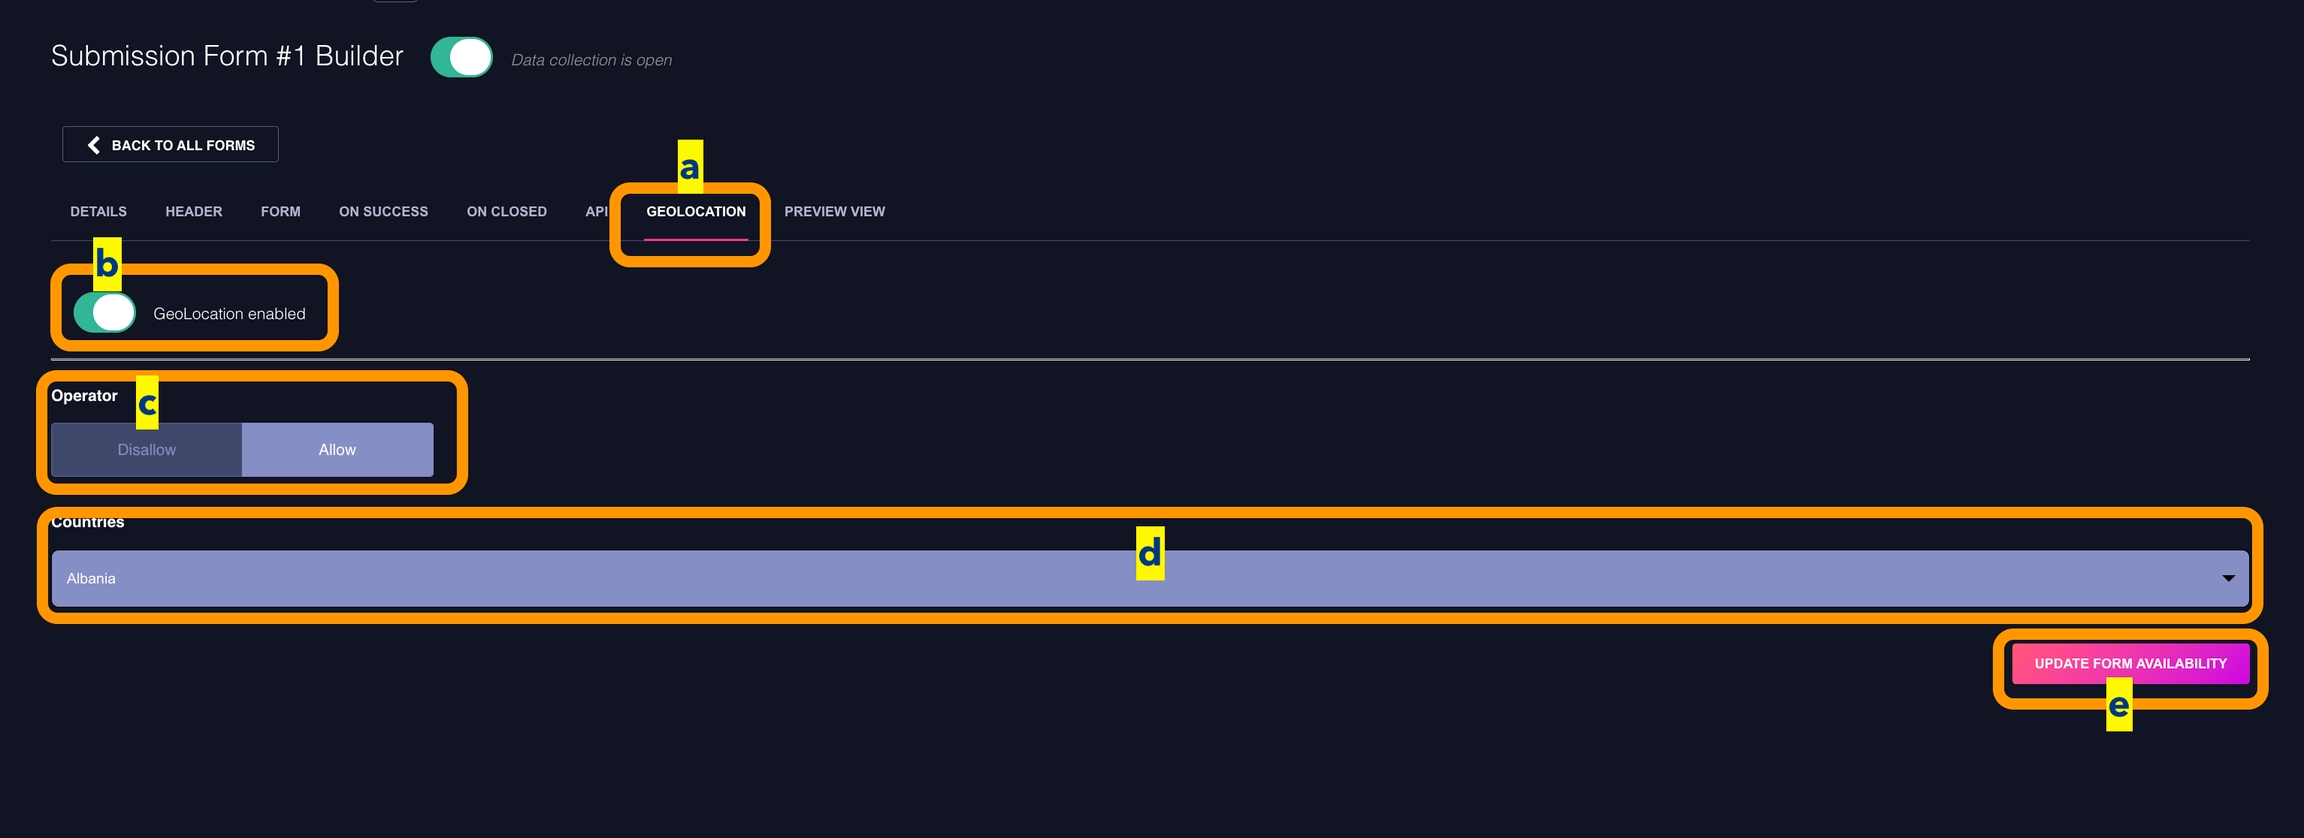
Geo-restriction
With our forms service, you can now specify the locations in which your forms are displayed to your users. This feature allows you to set up multiple forms on a single page, but only the relevant ones will be displayed based on the user's location. This way, you can show specific forms to specific regions, ensuring that your users get the most relevant content.
To set up location-specific forms, simply follow these easy steps:
Go to the form configuration/management panel
Click on the "GEOLOCATION" tab
Toggle on the Geolocation button
Choose your preferred geo-verification operator
Select the countries/locales that the operator applies to
Click on the "Update Form Availability" button
That's it. Your forms are now set up to display only to users in the specific locations you've chosen. This helps you ensure that your users are getting the right forms for their needs, improving their experience and engagement with your content.
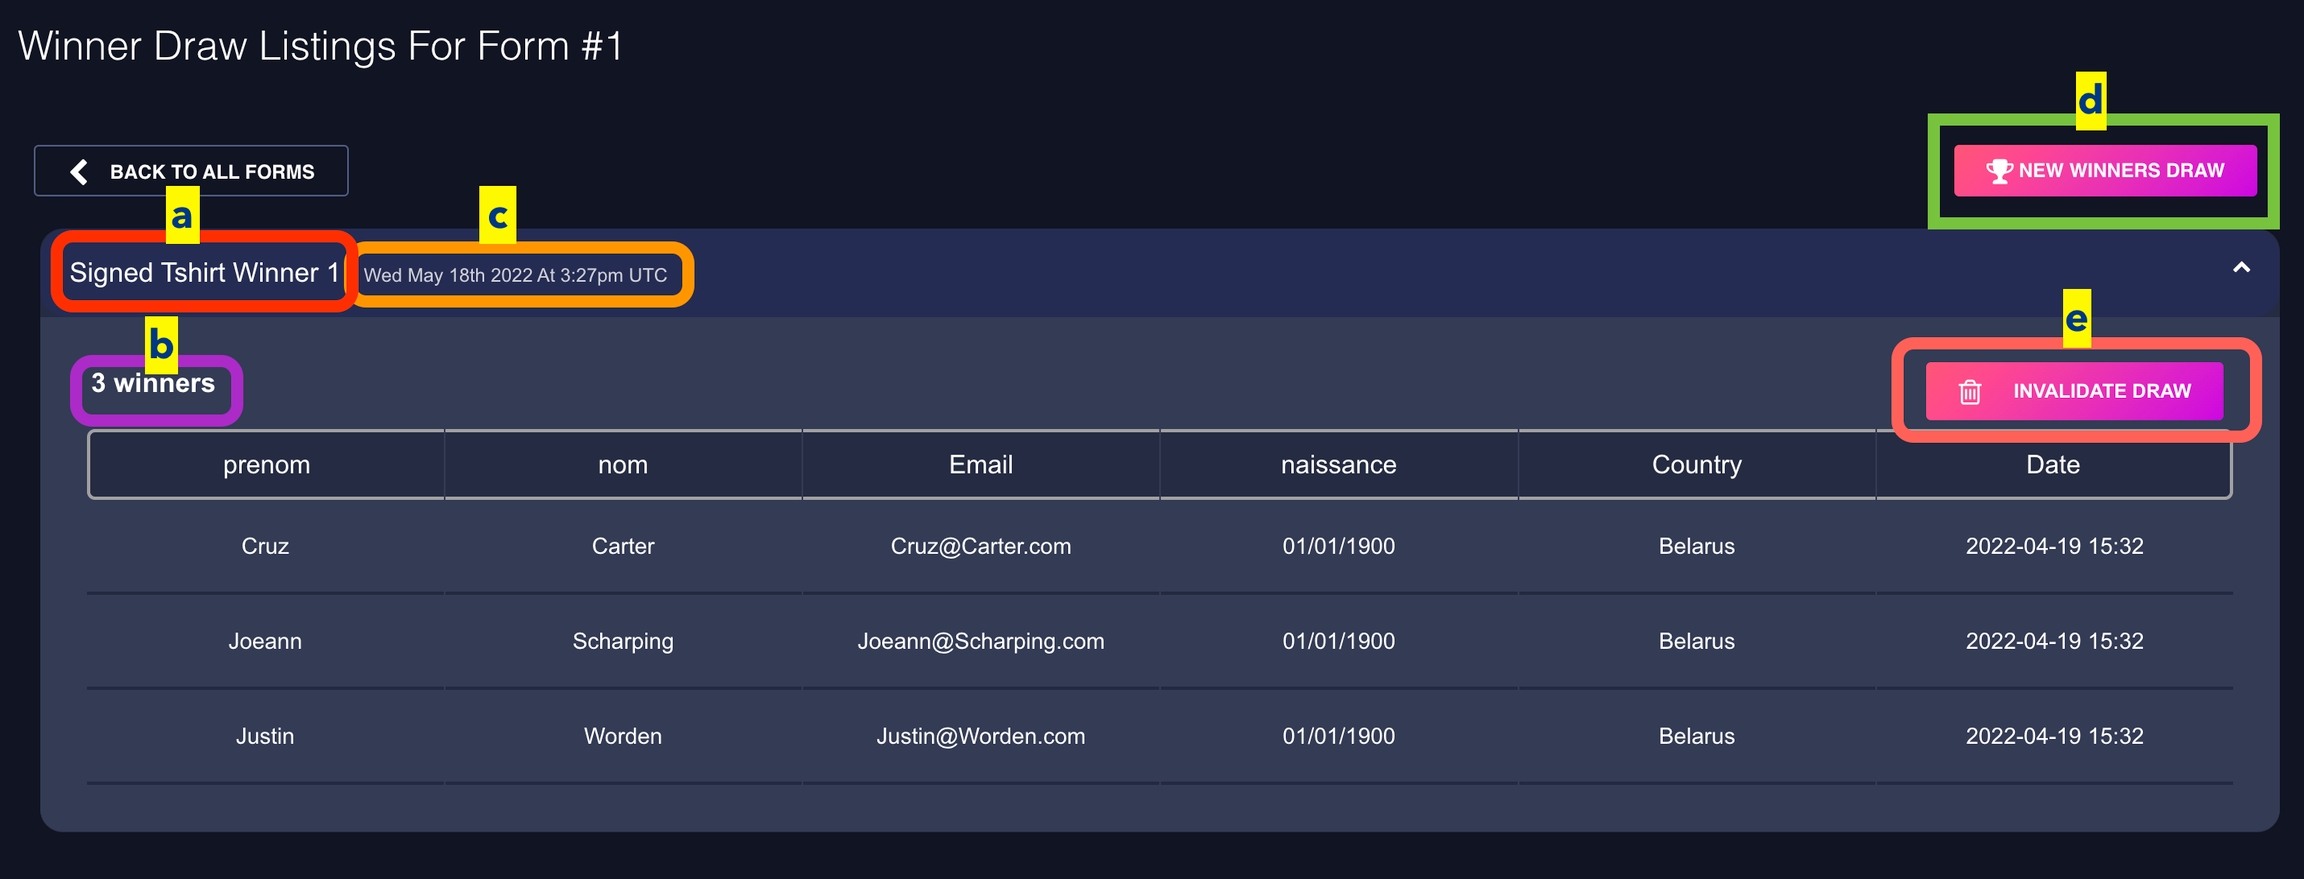
Winner Picker
Welcome to our Forms Winner Picker functionality. This feature is designed to facilitate the selection of winner records from your forms. Here's how to use it:
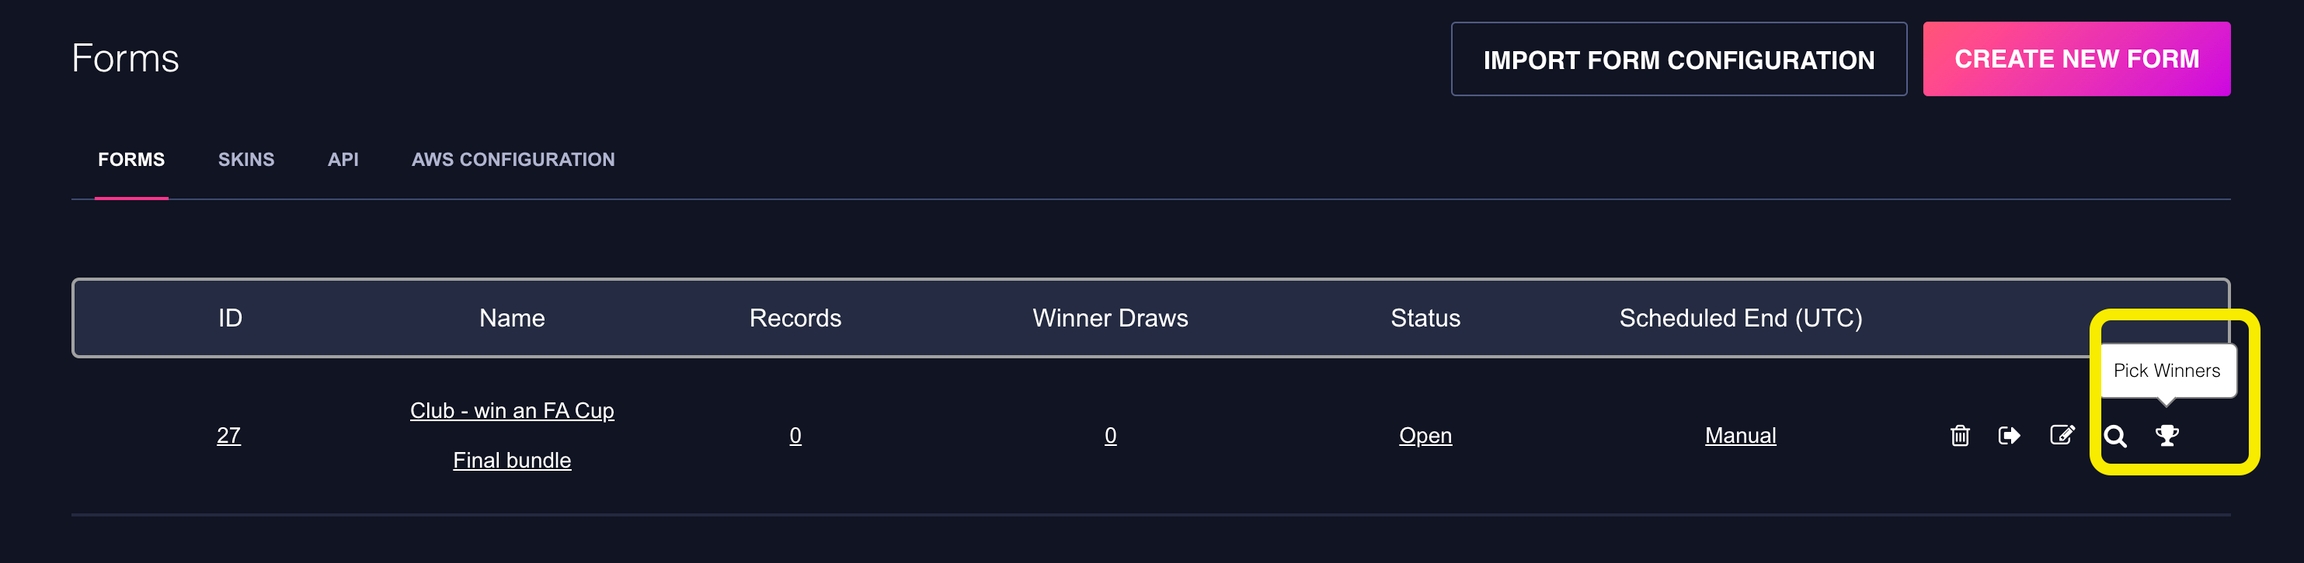
On your Forms project panel forms listing, click on the trophy icon on the right.
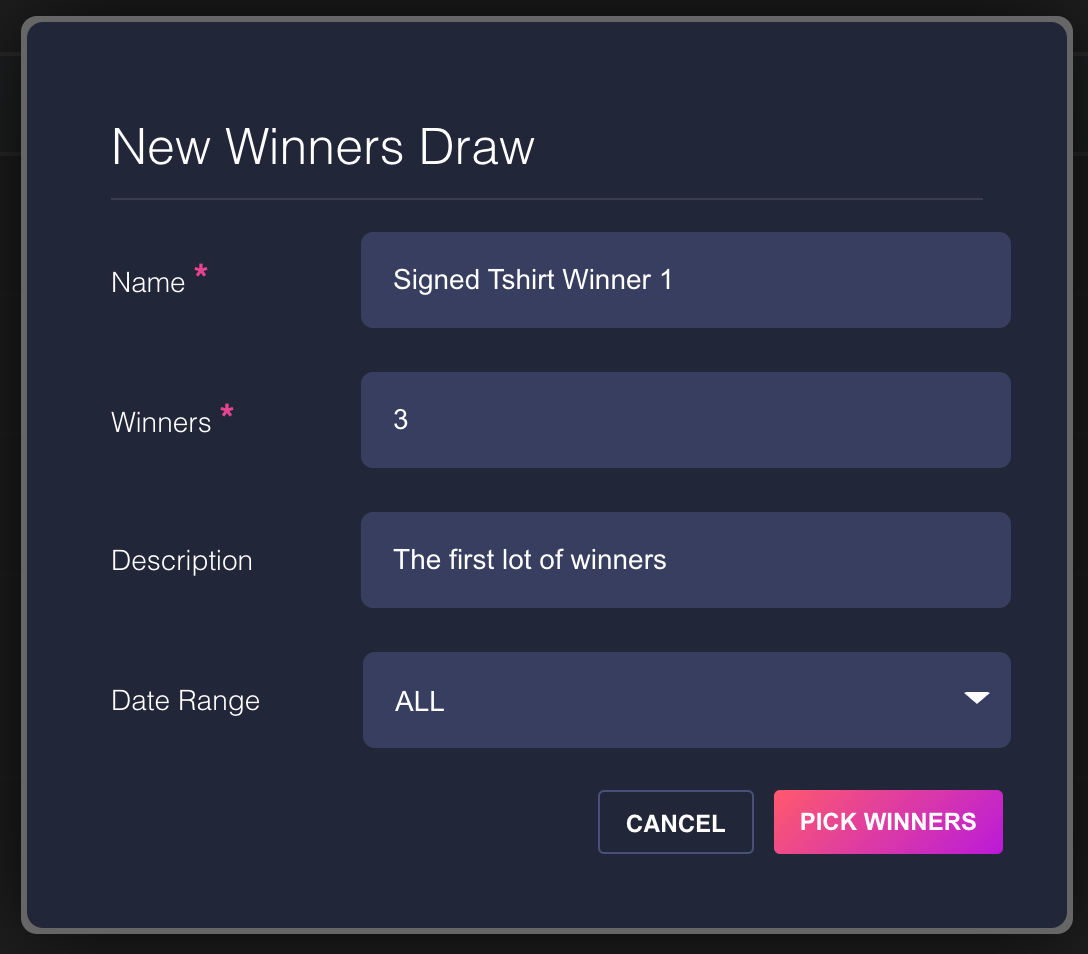
In the modal that appears, fill in a name for the draw, number of winners, and any other optional fields, then click on the “Pick Winners“ button.
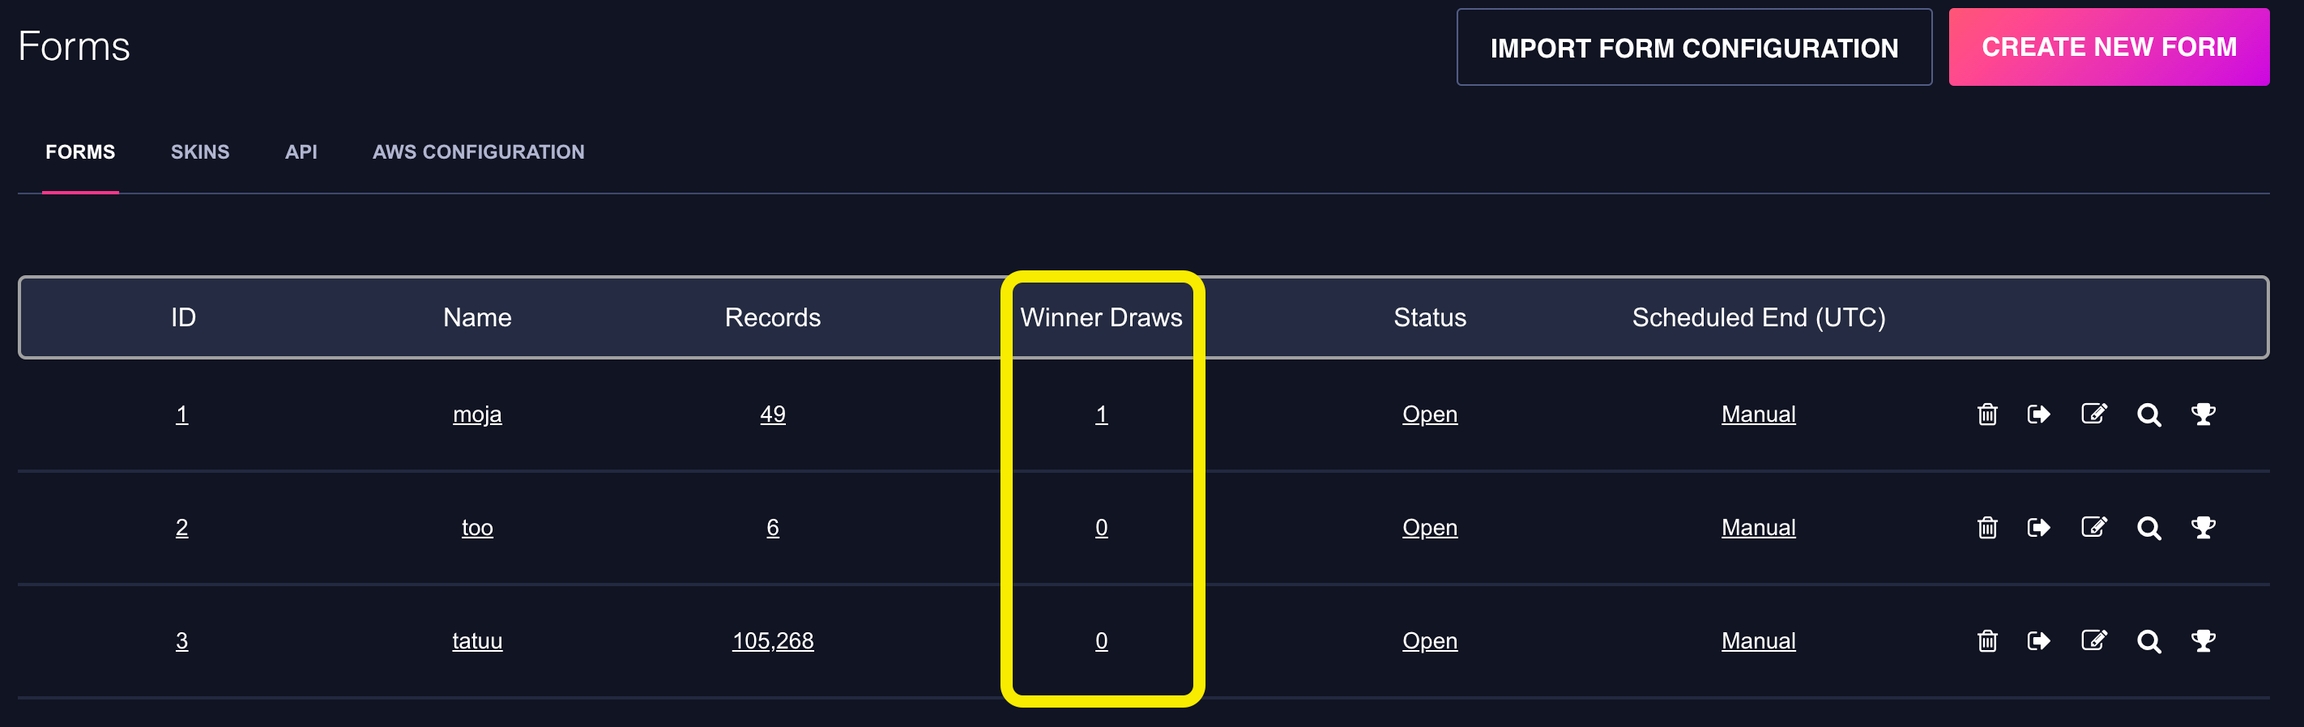
To access the winning draws and the records that they hold, click on the value on the “Winner Draws“ column for the specific form.
A list of the winner draws is then shown. By selecting a draw, you will be able to see the draw name (a), the number of records selected as winners (b), and the date and time of the draw (c). You can also start a new draw (d) or invalidate the draw (e) by clicking on the respective buttons.
When you click on the “Invalidate Draw“ button, a confirmation modal will appear requiring a reason for the invalidation. Invalid draws then appear highlighted in the winner draw listing, which can be expanded to show the full details of the invalidated draw.
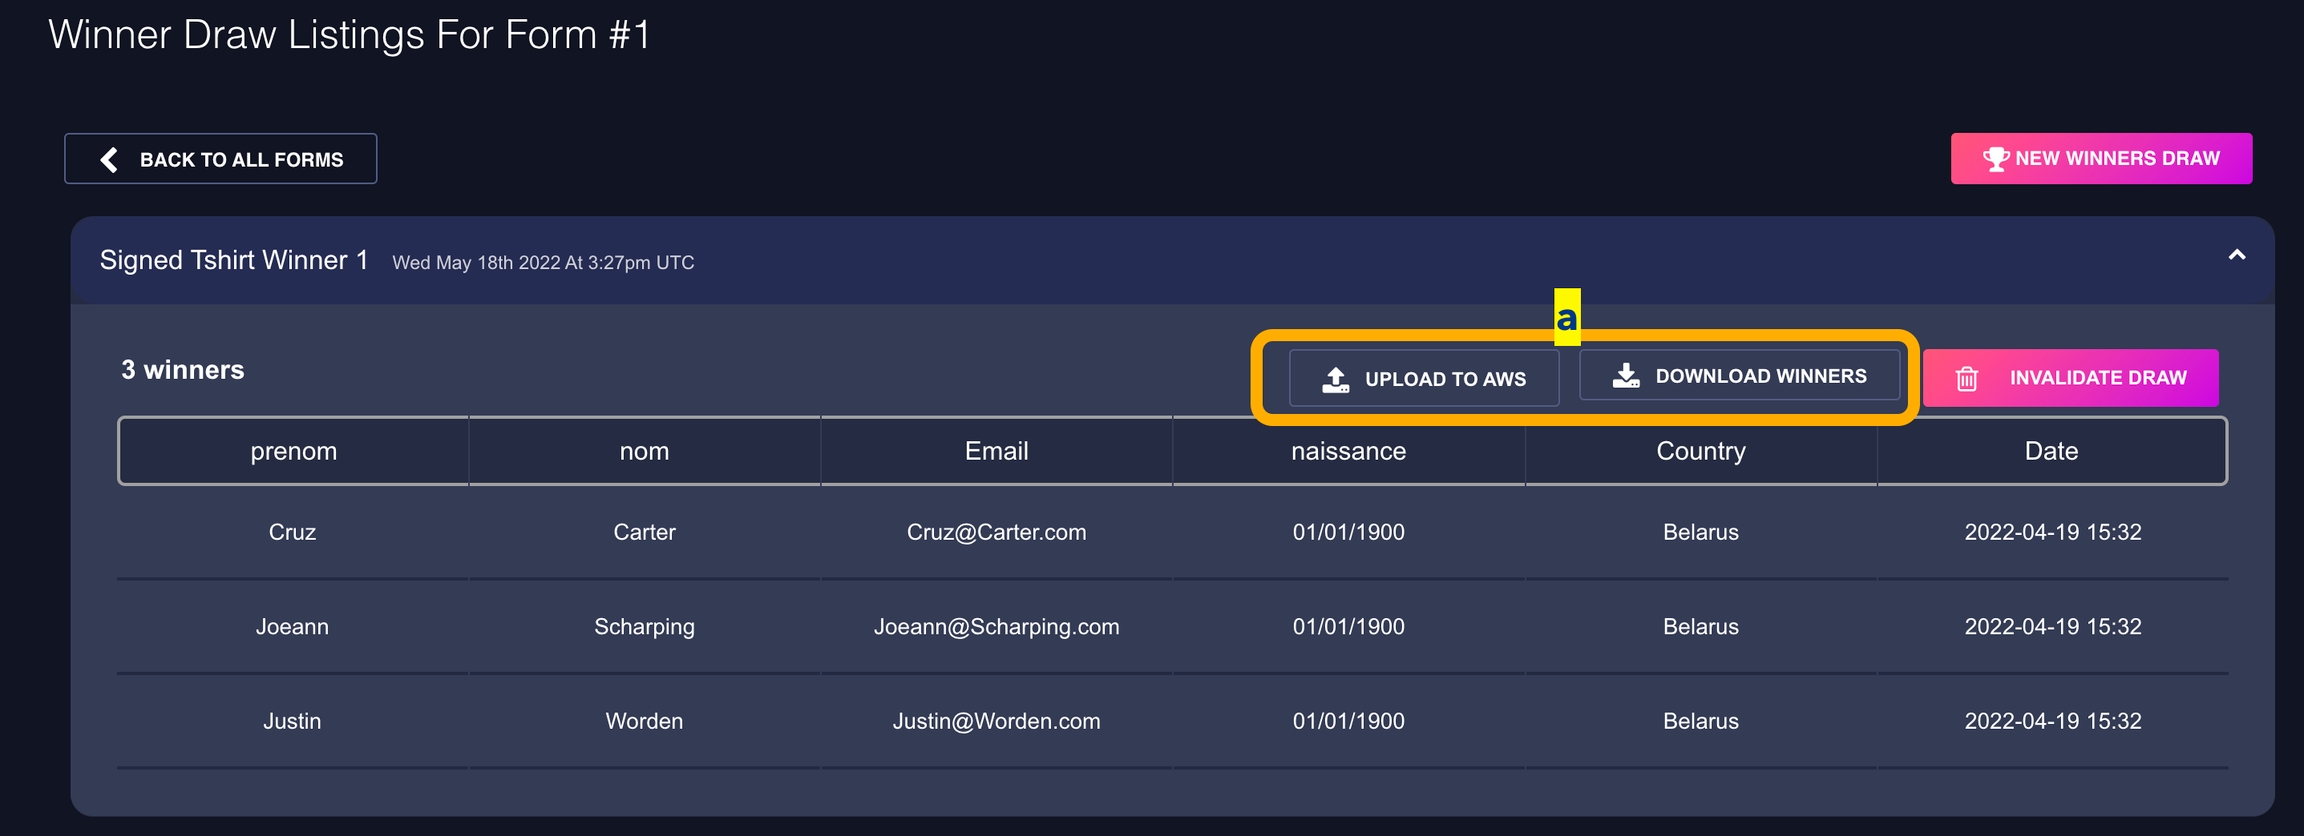
To export records, first enable exports within your system configuration. Once enabled, you will see the appropriate buttons for export within the draws panel.
With the Forms Winner Picker functionality, it is possible to pick winning records from the same form multiple times. Each winner selection is termed as a draw, and you can show different draws to different user regions. We hope this feature makes it easier for you to manage and pick winners from your forms.
Other Features Supported
In addition to its core functionality, our Forms service offers several other useful features that you may find helpful. These include the ability to create single or multiple stepped forms, and a user-friendly form builder that uses building blocks to make the process easy and intuitive.
You can also customise the look and feel of your forms using our simple skin.css feature, and even add custom JavaScript to further tailor the user experience.
When it comes to analysing the data you collect through forms, the service makes it easy to export results in CSV format directly from the Forms tab. And if you need to schedule or manually export your data to AWS, the services supports that too.