Loading...
Loading...
Loading...
Loading...
Loading...
Loading...
Loading...
Loading...
Loading...
Loading...
Method
Description
Starts playing the audio/video
Pauses the currently playing audio/video
Property
Description
Sets or returns the current playback position in the audio/video (in seconds)
Returns the length of the current audio/video (in seconds)
Event
Description
Fires when the audio/video has been started or is no longer paused
Fires when the audio/video has been paused
Fires when the current playlist is ended
The core concepts underpinning Player Layer
Player Layer™️ is an SDK which is deployed into your apps and sites, augmenting existing video players. It is configured and controlled in real time by Monterosa / Interaction Cloud ™️ Studio.
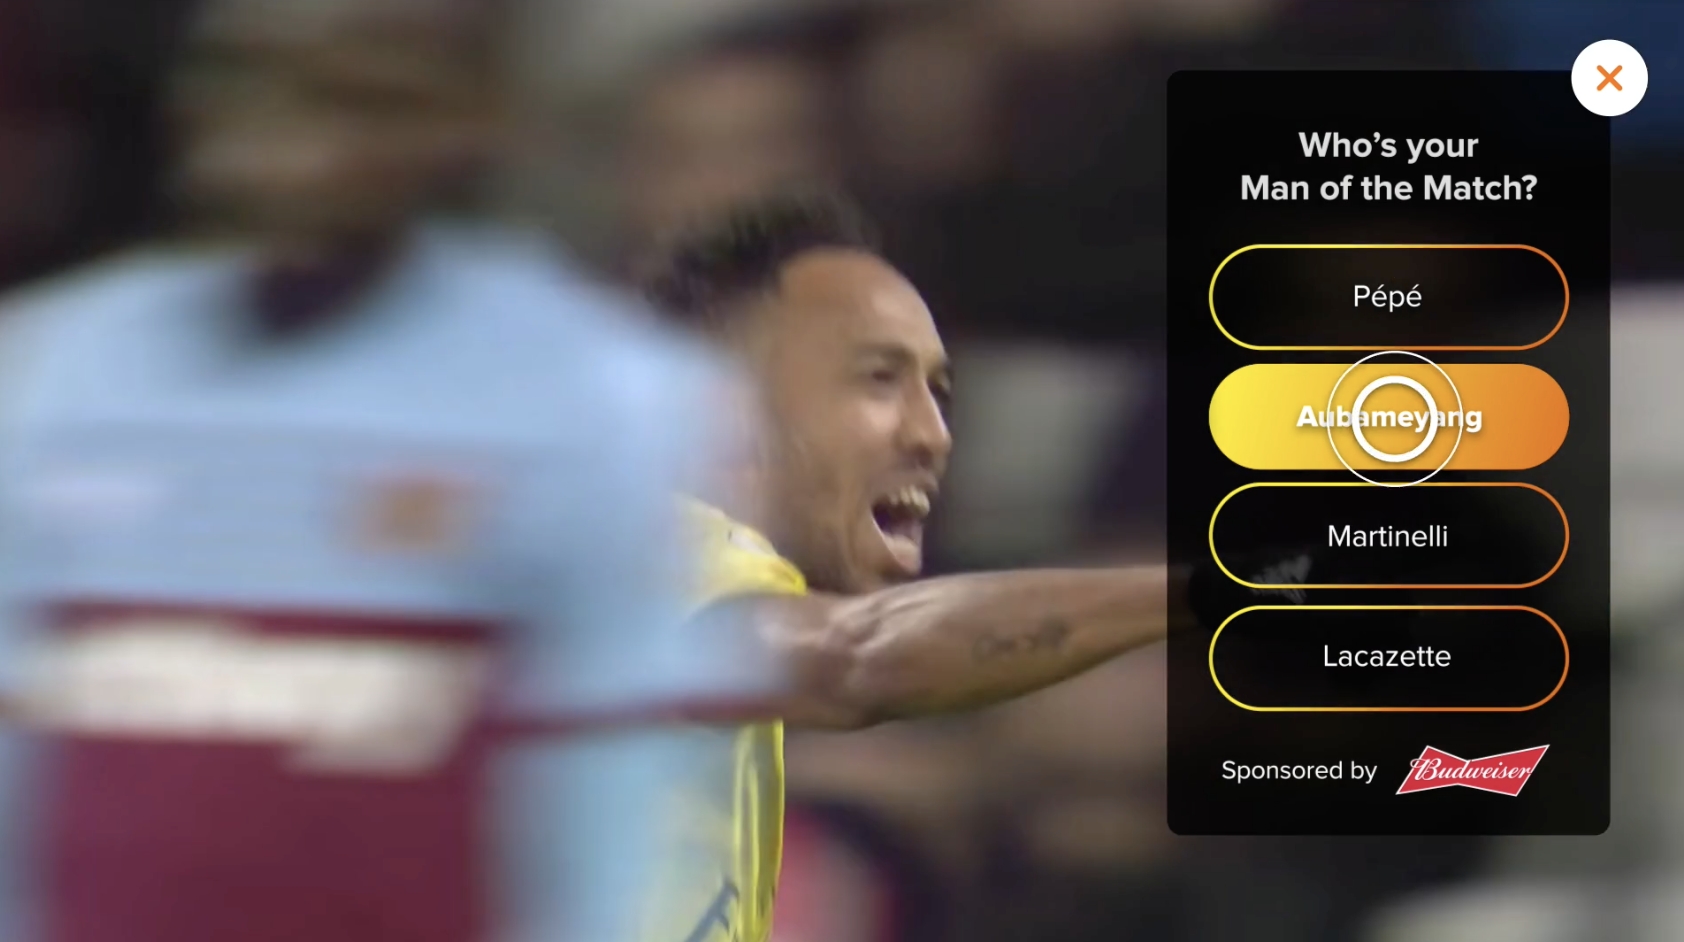
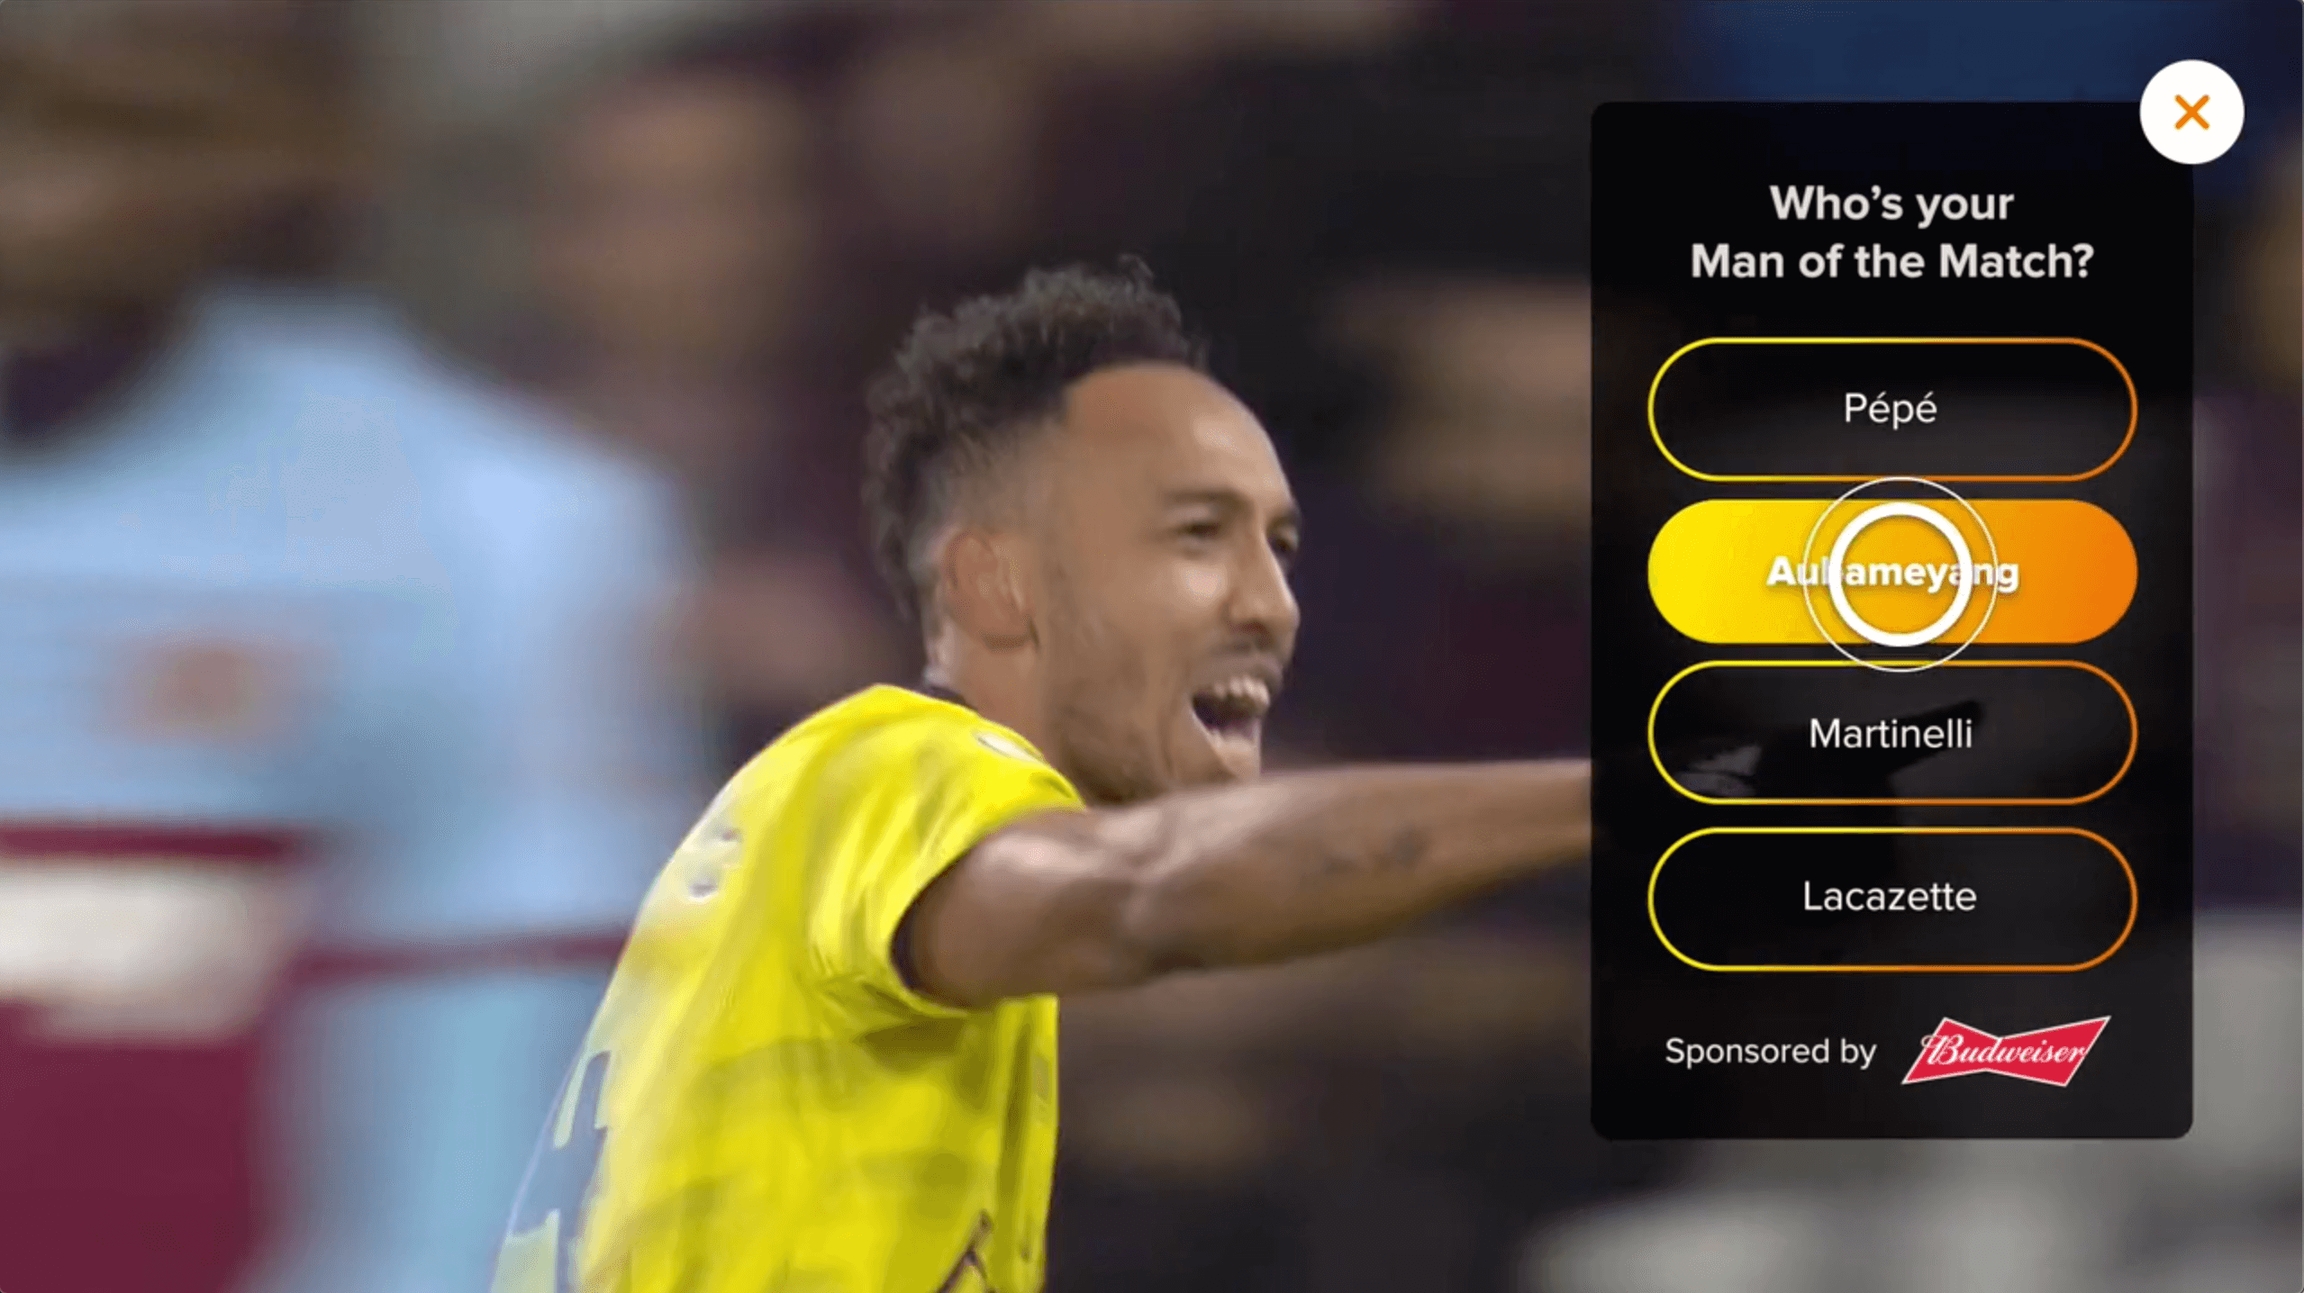
Layers are overlays, placed in a nominated position over the video. In the example below, the layer is a poll.
This is a visual indicator which appears on top of the video which a user can tap on to open an interactive Element. The TouchBug is fully configurable in terms of design and can be positioned in real time by the producer from Studio. The Producer can determine whether a particular Element should be opened by the user or whether it should automatically open without any user action. The Producer can also configure a TouchBug to 'pulse' in order to attract more attention from the user.
The Producer can also configure a TouchBug to 'pulse' in order to attract more attention from the user.
The Producer may also add an animating Alert Banner strap line to the TouchBug in order to provide additional explanation to the user and draw further attention.
Player Layer uses the Interaction Cloud's concept of an Event Schedule. An Event has a duration, a start and an end time which can be absolute or relative.
The event can represent the duration of a TV show or a sports game, or it can be a longer period of activity such as a day or a week. This is designed to encourage real-time thinking.
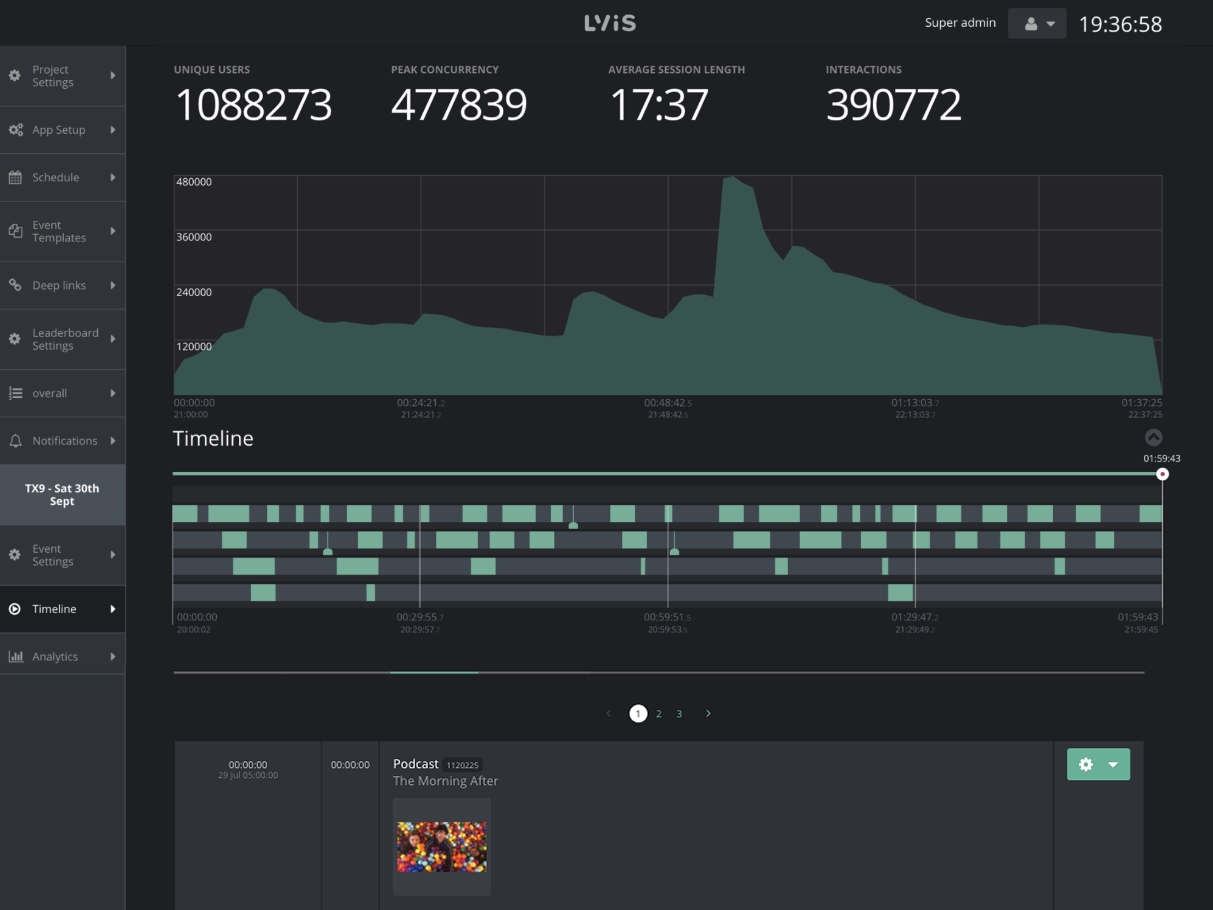
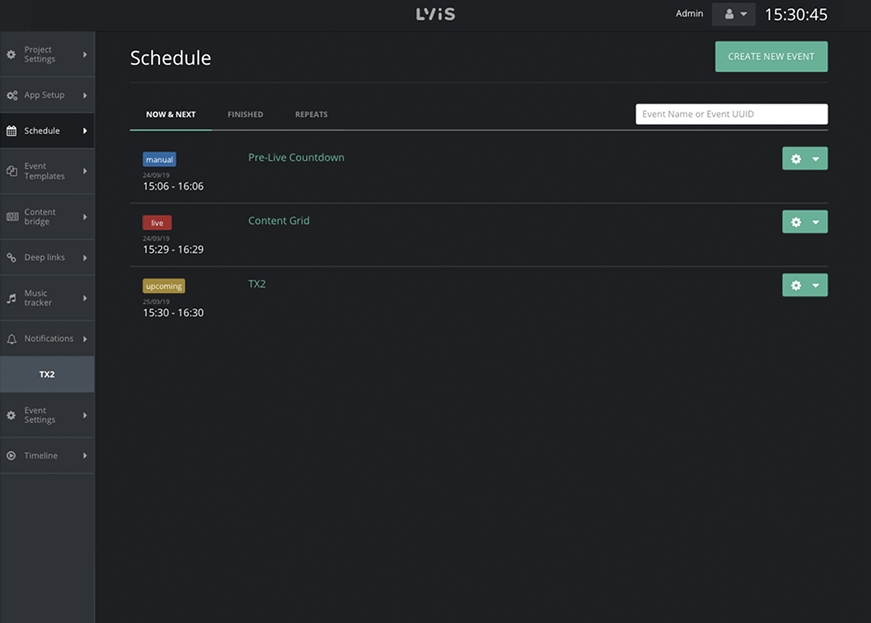
Here is an example of the Studio console showing a range of events.
Manual - waiting to be started manually
Live - live now
Upcoming - scheduled to start in future
On-demand - available at any time
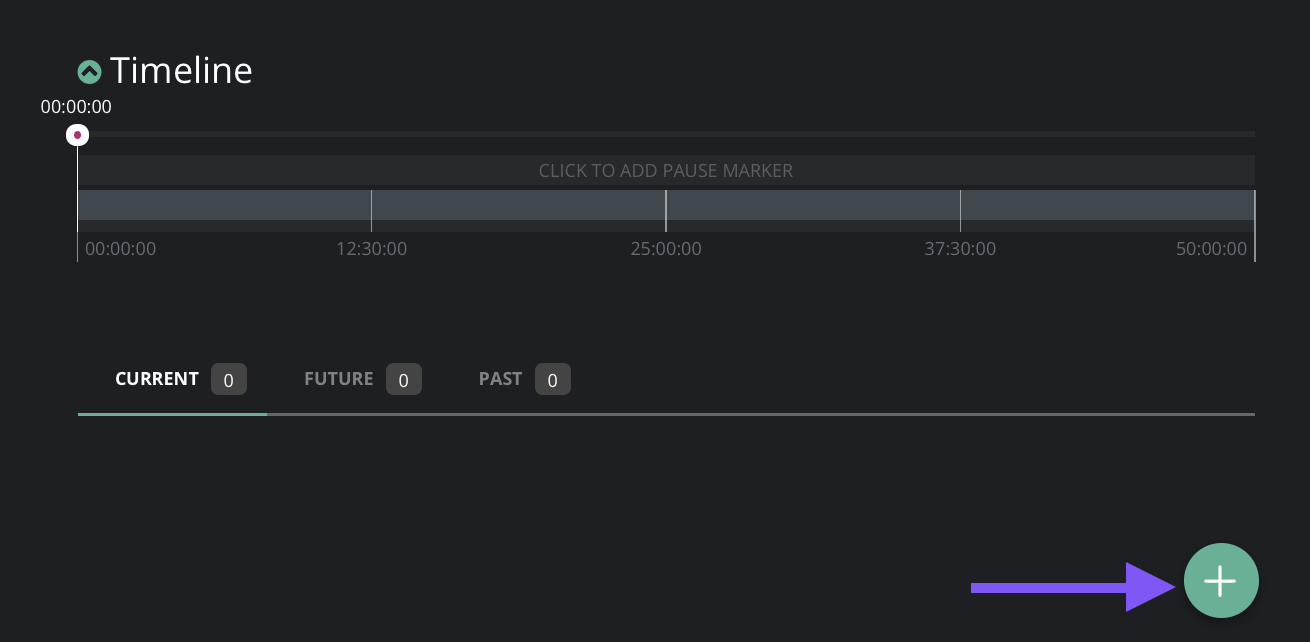
Inside every Event is a Timeline on which you can add, remove and edit two-way interactivity with the platform's content Elements. These include Polls, Trivia, Products and an ever-growing array of interactive units.
Unlike a traditional CMS, the Interaction Cloud does not just publish content one-way, it listens to the audience's response and re-publishes live results so that all users can feel like they're part of a community of participants. For example seeing what percentage of people answered a poll option and where their opinion sits on the public scale.
Interactive content Elements are the building blocks of Player Layer - content items that can be scheduled to appear at a specific time on a video's timeline or published at a specific point in time. The Interaction Cloud supports both live triggering and pre-scheduled content in live streaming and on-demand environments.
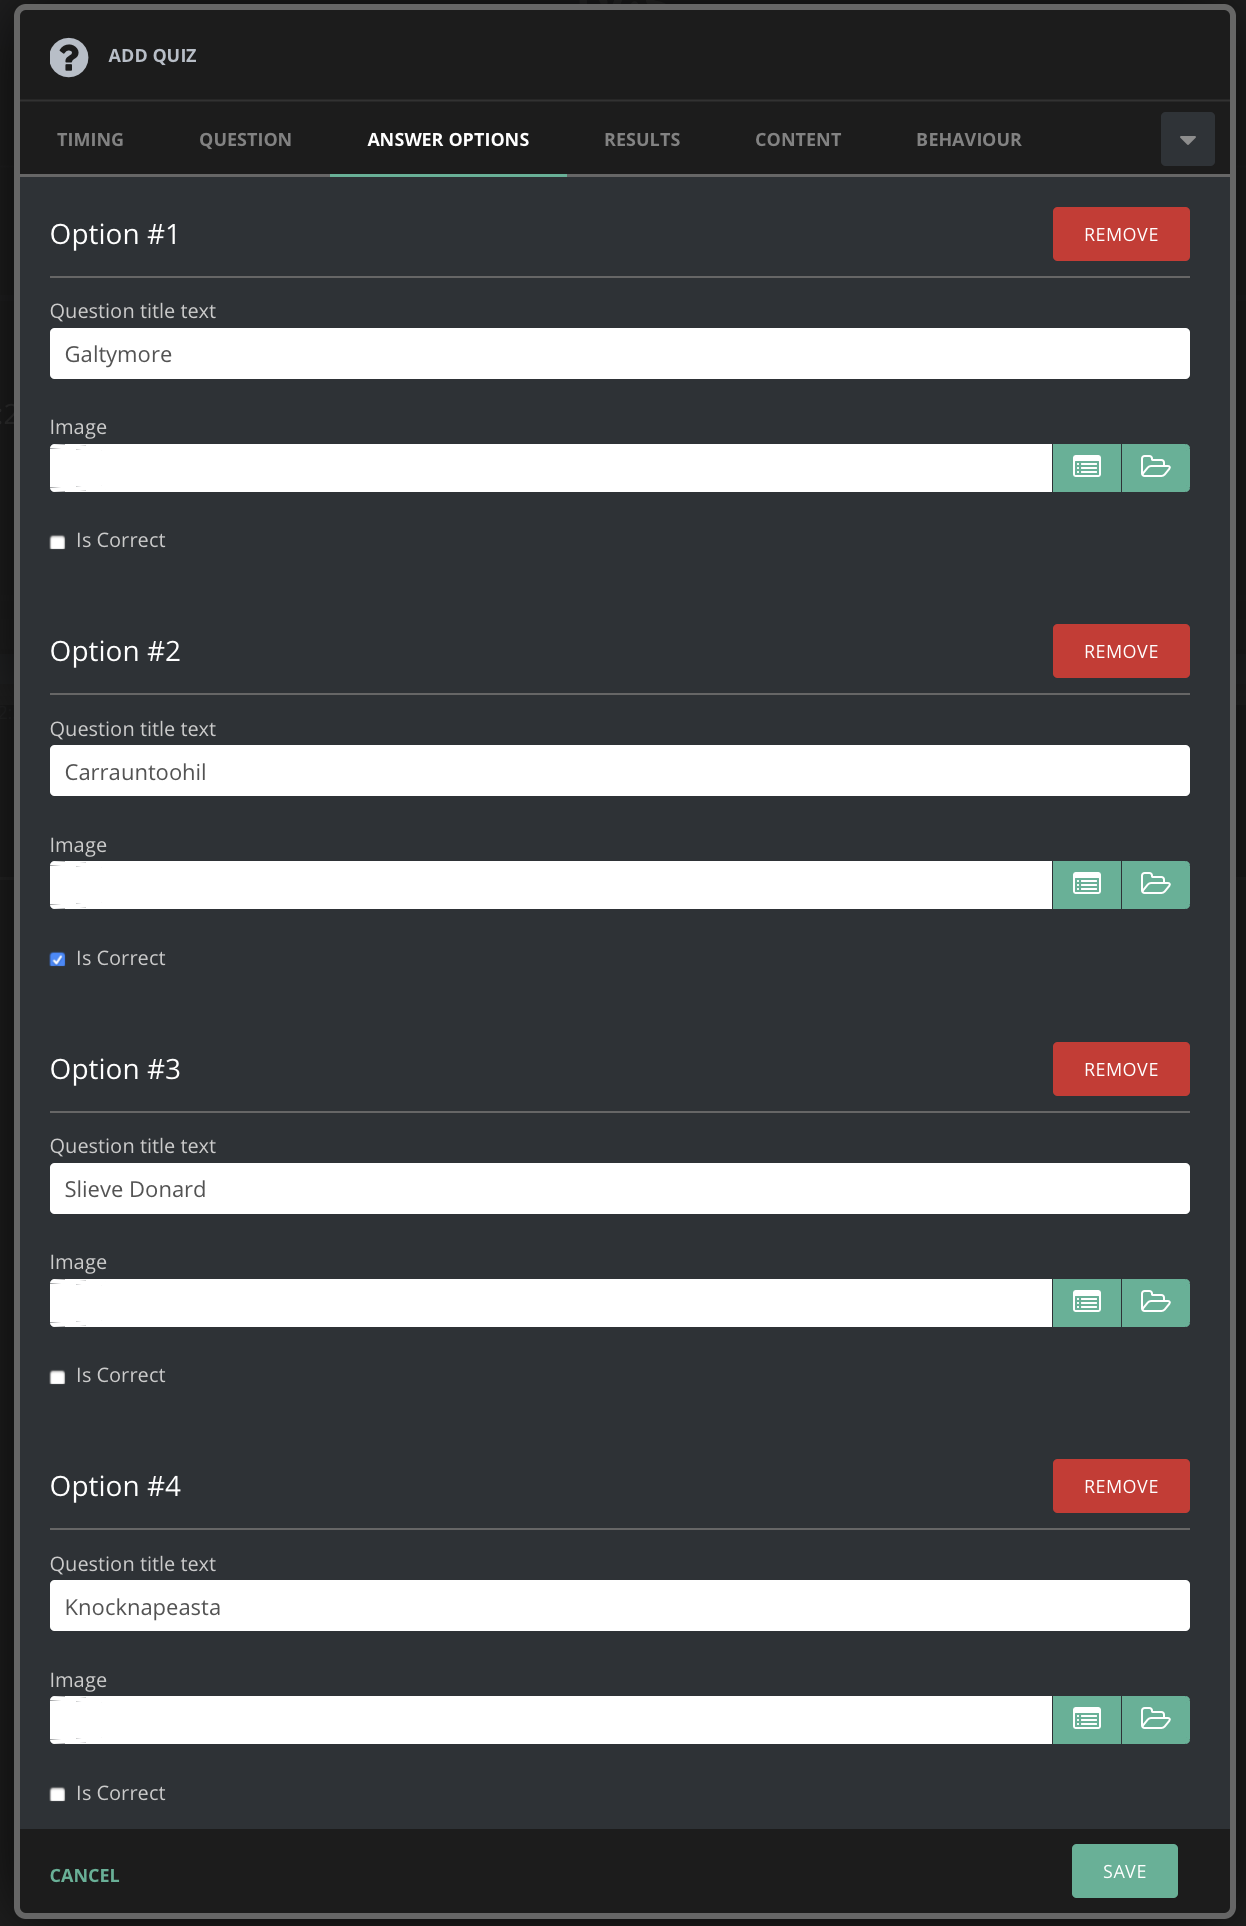
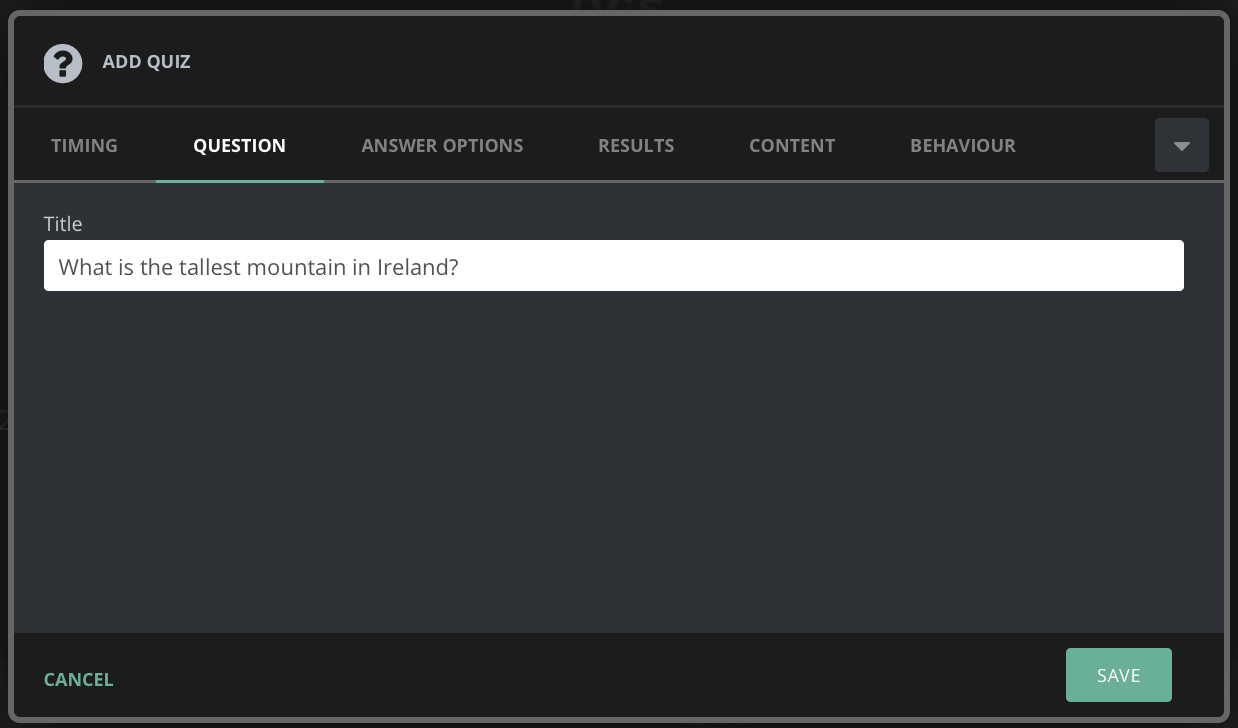
Each Element has its own settings and characteristics. This illustrates a Quiz Element being setup by a content producer. It can be setup in advance and triggered to appear only when needed.
To learn more about Element configuration read the Element Configuration guide.
All content Elements are created, scheduled or published live from Studio either manually or automatically via integration into an external CMS or data feed.
When an Element is created and published into the Timeline, it triggers instantly within live events. Most users will receive the Poll, Article or other Element in under a second. Elements can usually be Revoked if a mistake is made. In on-demand use cases the changes may require the video asset to be reloaded.
Element types currently supported include polls, quiz questions, text, image, eCommerce product promotion (with or without poll). Custom Elements - for example with integrated data feeds - can be added as required as custom extensions.
Player Layer is a beta product under development. New Elements are being added and changed frequently without notice.
The example below illustrates a custom layer for a specific sport, developed as a Layer extension by the Monterosa team.
Current and roadmap platform support
Player Layer is currently available as a JavaScript library for web video players including:
HTML Video
Brightcove
YouTube embeds
Vimeo embeds
video.js or derivatives
SDKs for native iOS and Android players are planned for Q2 2020.
When setting up Elements within Studio there are several options you have to get the User experience to be exactly how you want it.
The number and types of Elements you can see is dependent on the versions you have
Once an Element is selected you must configure a number of settings, some of which are general and others specific to each Element.
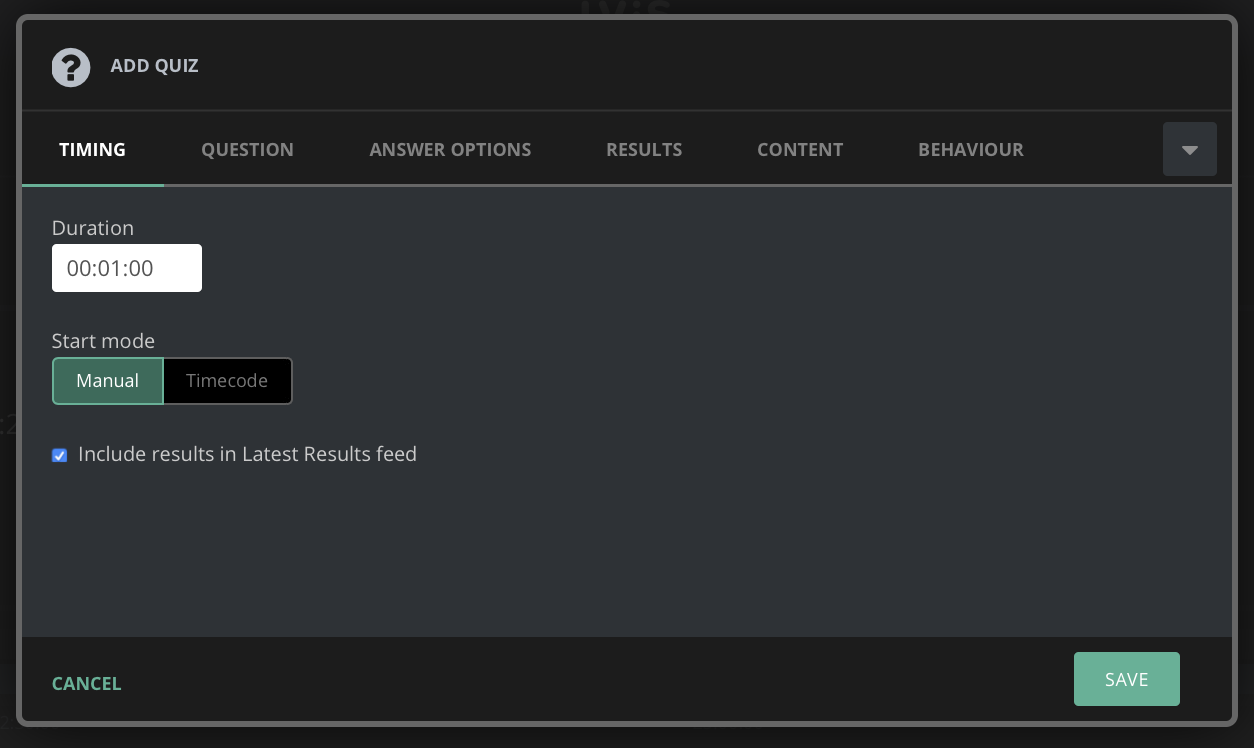
Duration: How long the Element will appear on the users screen and how long they can interact with it
Start mode: Using the Timecode setting means you can have the Element appear at a specifc point within the event without manually intervention. This is especially key for on-demand content where the Timeline of the event is synced with the video timeline. Using Manual here will save the Element in your "Live library" where you can manually publish at any moment while the event is live.
Include results in Latest Results feed: This publishes the results of the Element i.e how many people selected which answer, to the results API endpoint
Simply enter the user facing question for the quiz Element here.
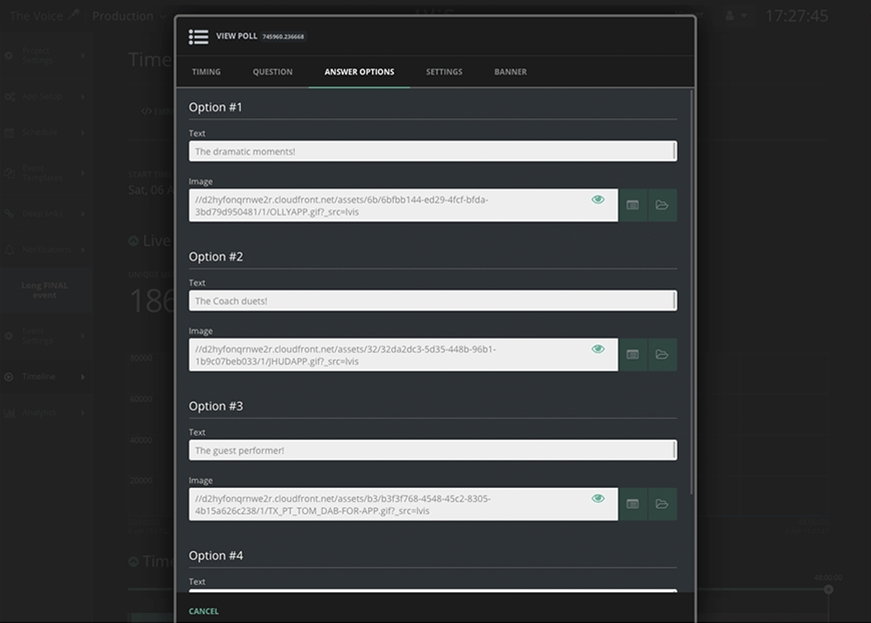
You can enter between 2 and 4 answer options for the user. These can be just images, just text or both together.
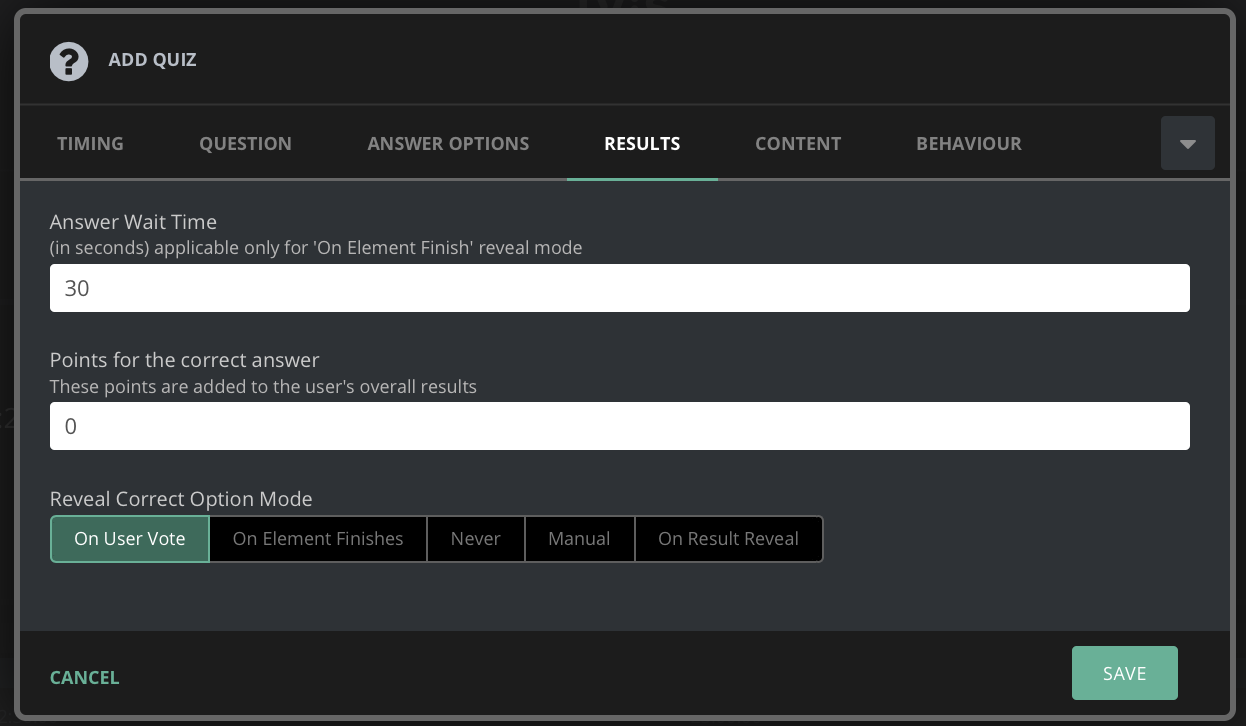
The answer wait time option specifies the number of seconds after the element starts to reveal the answer. This is only applicable for "On Element Finish" mode. The points for correct answer option only comes into play if gameification is set up
Selecting the "On Reveal Result" option means the answer will only be revealed when the "Reveal Result" element is published on the Timeline
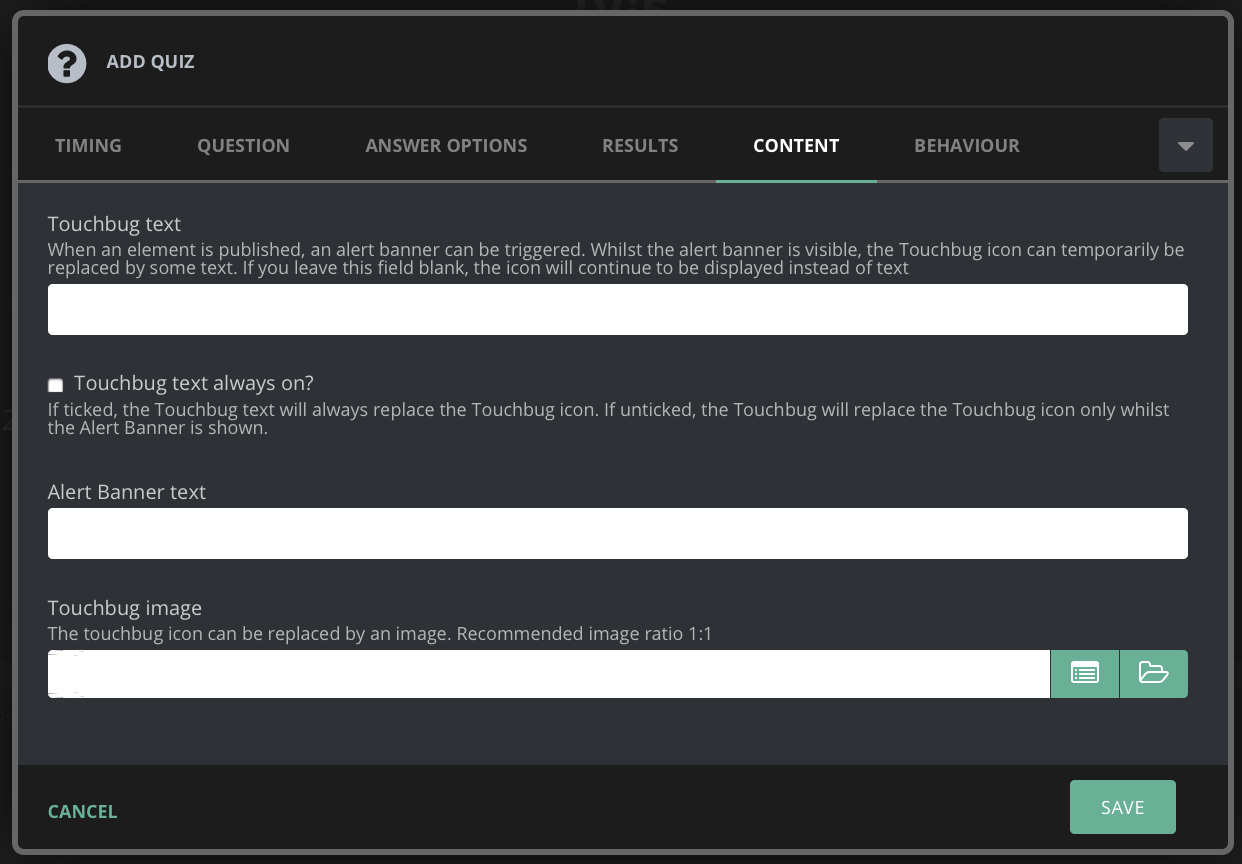
In the content tab you can find all the settings you need to set up your user interact-able TouchBug
The Alert Banner text is an optional banner that slides out of the TouchBug temporarily to inform the user that something new has been published.
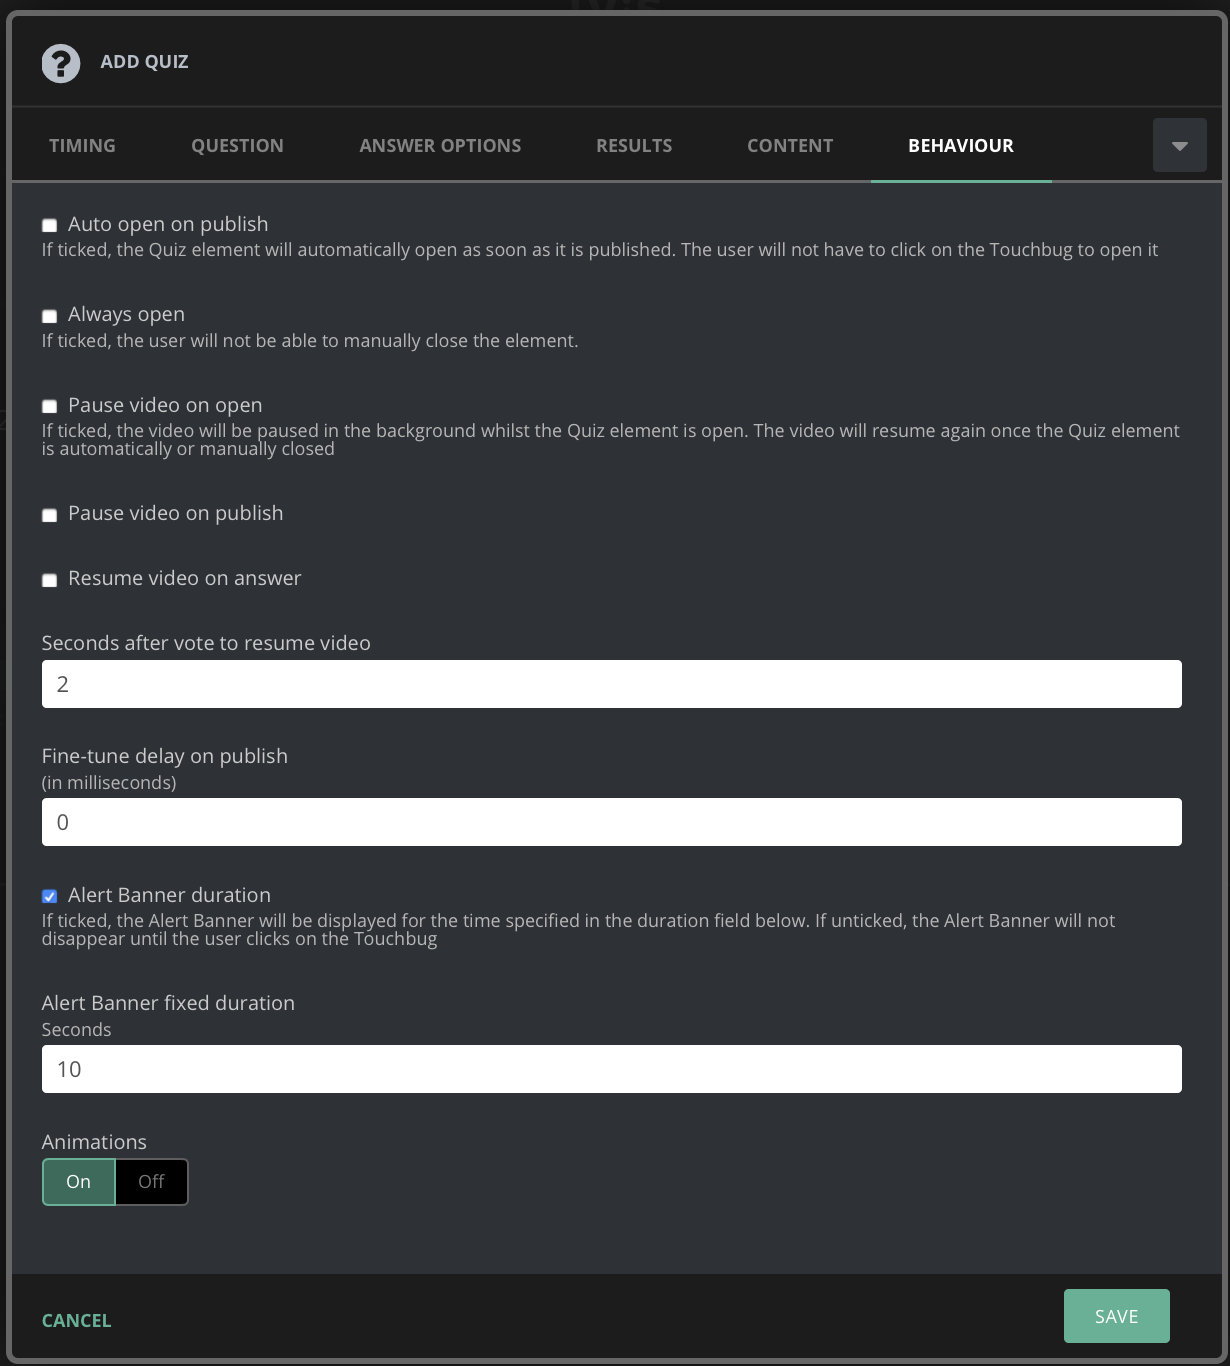
Auto open on publish: As soon as the Element is published on the timeline and appears in Player Layer it opens and skips the TouchBug step
Always open: This prevents the user user from dismissing the Element back into the TouchBug forceing it to stay open once its opened (either automatically or by the user)
Pause video on open: Once the Element is open (either automatically or by the user) the video is paused. (you can configure your player so the user can't resume it manually if required)
Pause video on publish: This pauses the video on publish no matter if the Element is open or not.
Resume video on answer: When he user has answered the question or poll then the video is automatically unpaused.
Seconds after vote to resume video: This is the number of seconds after the user has answered thr question/poll to resume the video, it is recommend you let the user see the option they choose for a second or two before resuming.
Fine-tune delay on publish: If you want the Element to appear at a more precise time on the video timeline you can add a delay here. The standard and simplified Element publishing works on whole seconds, if you want to publish an Element 3 minutes and 3.5 seconds into the video you can publish the Element at 00:03:03 and then add 500 milliseconds to this field.
Alert banner duration and fixed duration: This controls how long the alert banner stays expanded from the TouchBug
Animations: The Touchbug can be configured to animate slightly so the user is enticed to tap on it, this controls if that is enabled or not.
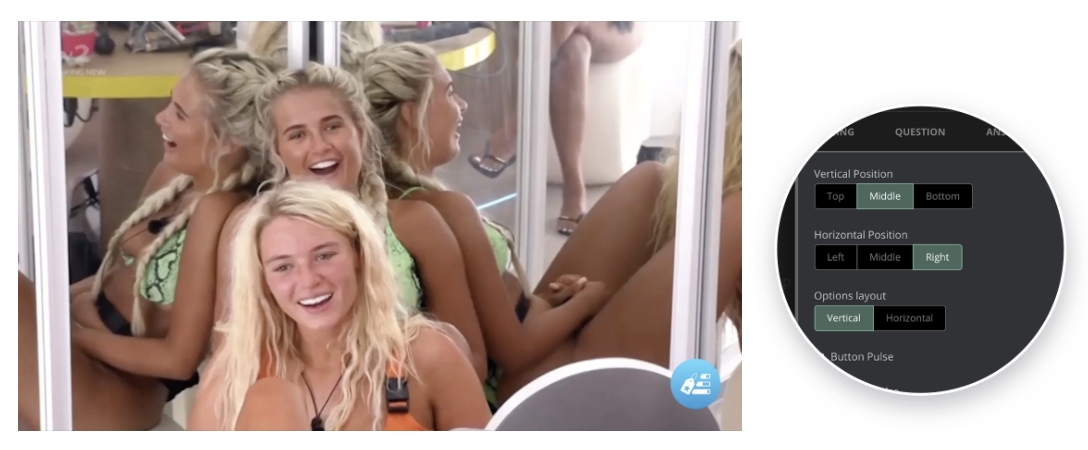
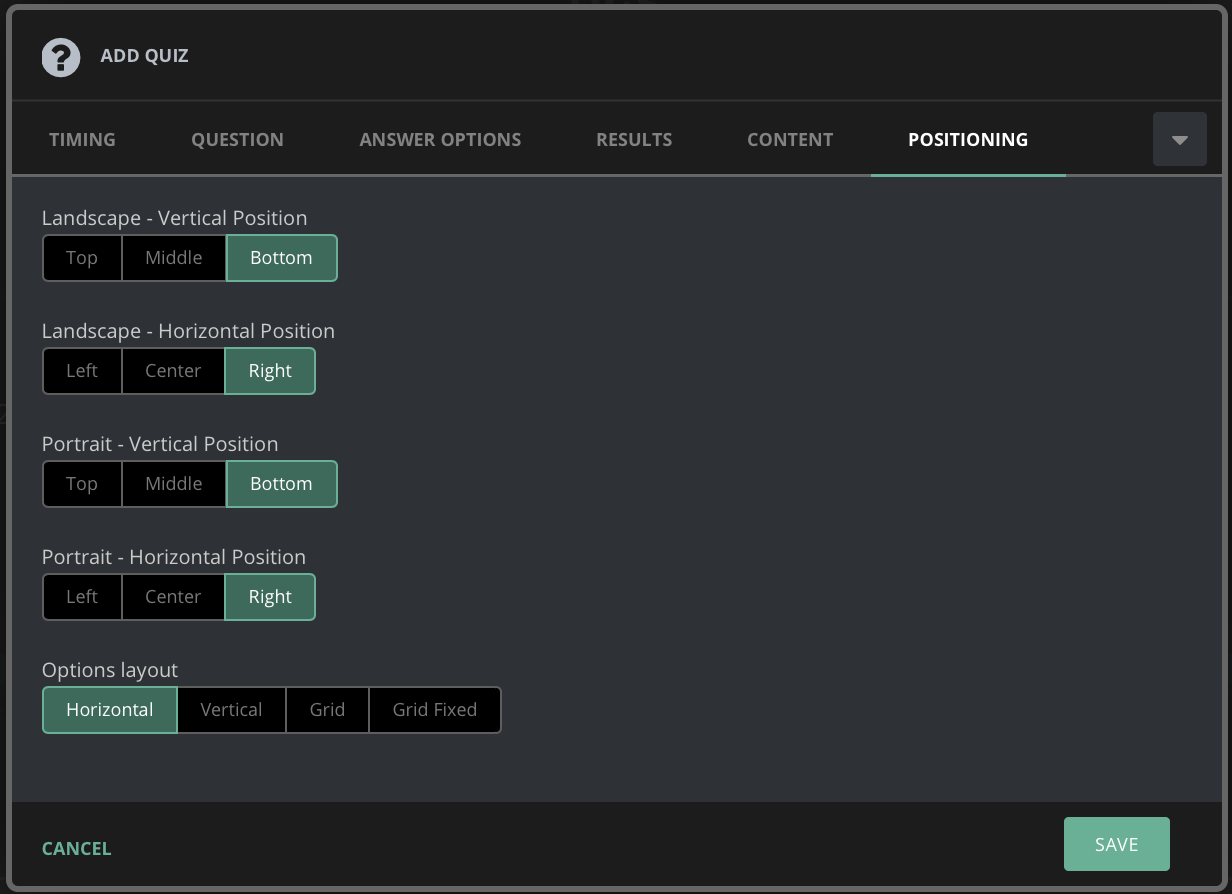
Using these options you can position your Element wherever you want in relation to your video while it is using Over mode. This can be configured differently for Landscape watching and Portrait watching.
The options layout settings dictate how the answer options are laid out for questions and polls.
Horizontal - This will lay out the options beside each other in a row
Vertical - This will stack the options on top of each other
Grid - This will use a row and column system to display the options in rows of 2
Grid Fixed - On small devices where space is at a premium the Grid option above will be adjusted to fit the space better, Grid Fixed prevents this from happening and ensures the options are laid out in 2 rows of 2.
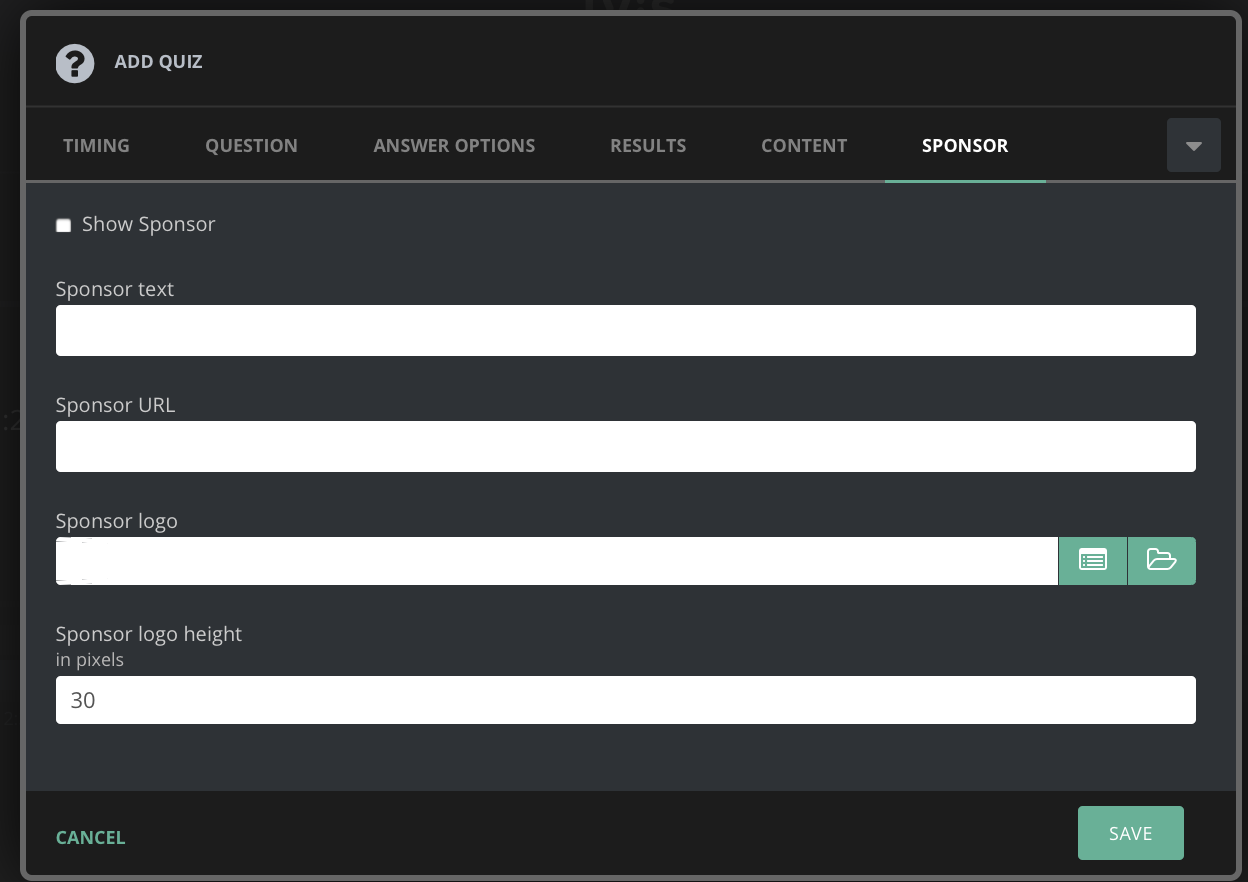
You can add an Element sponsor which will sit below the Element and when tapped can take the user to the sponsors website.
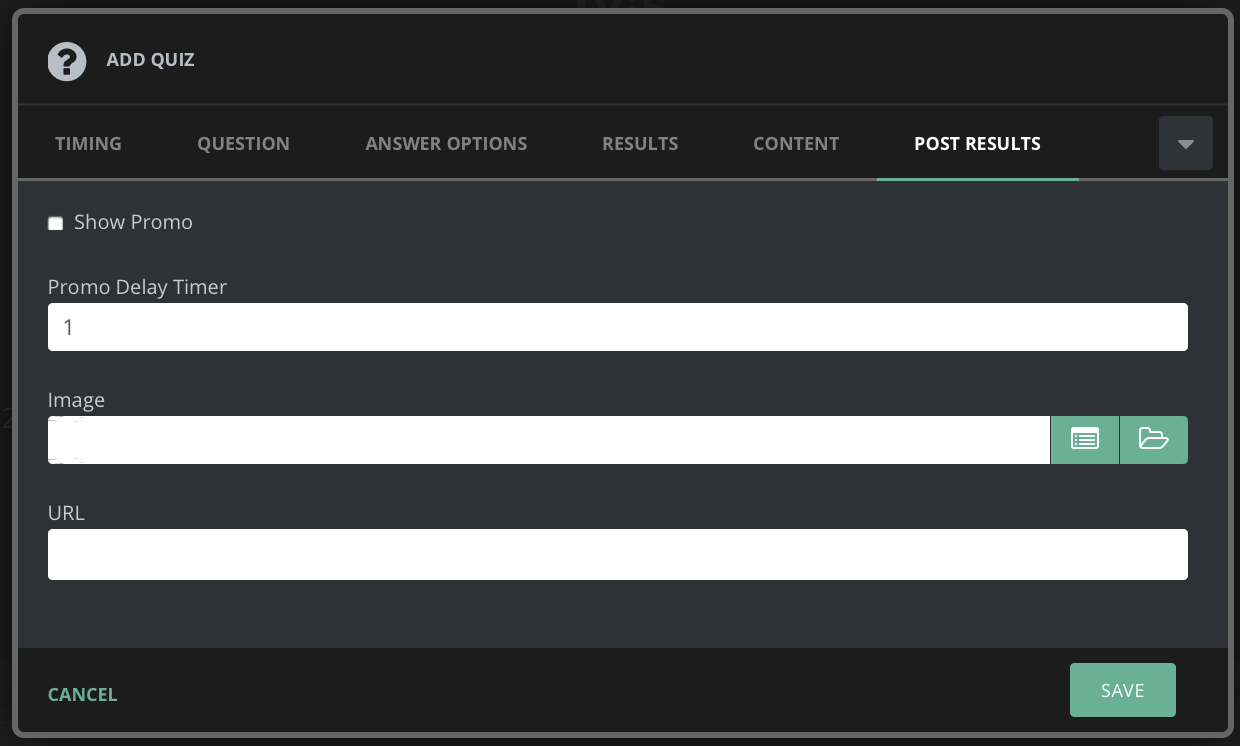
Another great way to dispaly advertisements and promotions is through the "Post results" settings. Configuring these wait a number of seconds (Promo Delay Timer) after the user has answered a poll or a question and replace the poll with an image that when tapped will open an external webpage. Example:
If your poll was sponsored by another brand once it has been answered you could display a promotion from the brand that thanks the user for voting and intices them to go to that brands site.
Creating custom video player adapters
Player Layer uses adapters to connect itself to your video player. The default adapter relies on compatibility with W3C DOM standards as detailed in the Custom Adapter References. For example, video.js and Brightcove players adhere to these standards.
Where your player varies, it will require a custom adapter.
If you want we can create a custom adapter for your specific player so you don't have to. Please speak to your relationship manager to discuss creating a custom adapter.
An example of what a custom adapter should look like:
An example of a custom adapter made for the YouTube video player:
Guide to allow Player Layer to work in a fullscreen video player
Player Layer doesn’t encapsulate the logic to work when the video player is in fullscreen. Player Layer renders itself in provided HTML Element container. To support Player Layer while your player is in fullscreen please follow the guide below.
Firefox >= 10
Chrome >= 15
MS Edge >= 12
Safari >= 5.1
iOS Safari and Webview (iPad) >= 12
Android Chrome (Phones and Tablets) >= 18
iOS Safari and Webview (iPhone)
Android Webview (Phones and Tablets)
Most Modern versions of desktop browsers support the fullscreen API while Android Webview and iOS Mobile devices don’t. However there are workaround which are descibed below.
Fullscreen support is implemented using the DOM API which provides the ability to display any HTML Element fullscreen. To Facilitate this you need to layout your video player and Player Layer in a specific way. This layout should consist of a common container with your video player and Player Layer inside.
You also need to implement two actions: 'enter full screen' and 'exit full screen'. For the enter full screen action we need to disable the default fullscreen button on video player (as it will fullscreen only video but not the container) OR intercept and invoke a handler. The code of both actions provided below:
Once enterFullScreen() is invoked the '.container' html element will be taken to the fullscreen and as such the video and Player Layer container will be stretched to its size.
As long as fullscreen is not support on mobile webviews and iPhones we have to implement a workaround.
The main idea of the workaround is that we need to stretch the container with your video and Player Layer to the full size of the screen and prevent mobile devices intercepting the video stream so that video is not played in the native mobile player.
Add playsinline property for tag to disable native playback interception.
Implement a custom fullscreen button that will take the container and overtake the content of the whole page.
An introduction to Player Layer, part of Monterosa / Interaction Cloud
Fans increasingly consume content on their personal devices. More than ever, those devices combine video with interactivity via their favourite apps from Instagram to TikTok.
Player Layer™️ is part of the Monterosa / Interaction Cloud: the platform for real-time engagement.
Player Layer is in beta and evolving. Please treat documentation as indicative and subject to change without notice
Player Layer makes your standard video player interactive, enabling timed, and positioned inclusion of audience interactivity, gamification, data and shopping as an overlay on video streams both live and on-demand.
Player Layer is can be easily integrated into an existing video player with a simple SDK. Once integrated, you can configure, populate, position and trigger the interactivity either scheduled in advance, synced to a timecode or manually.
The benefits of using Player Layer are:
Increased engagement and enjoyment: adding interactivity to video deepens the engagement of viewers to the content, differentiating the experience and boosting retention
Monetisation: Player Layer opens up a new set of commercial opportunities including sponsor integration and pushes to eCommerce
Data collection: interactivity on video opens up another avenue to deepen understanding of viewers
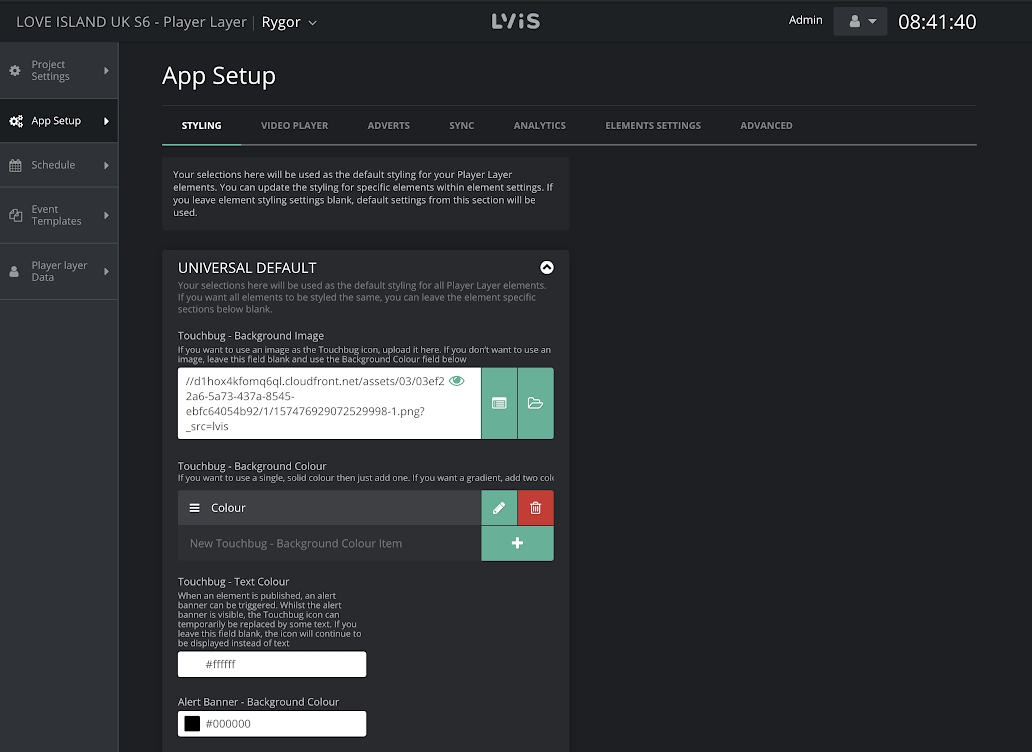
A guide to configuring Player Layer UI Elements
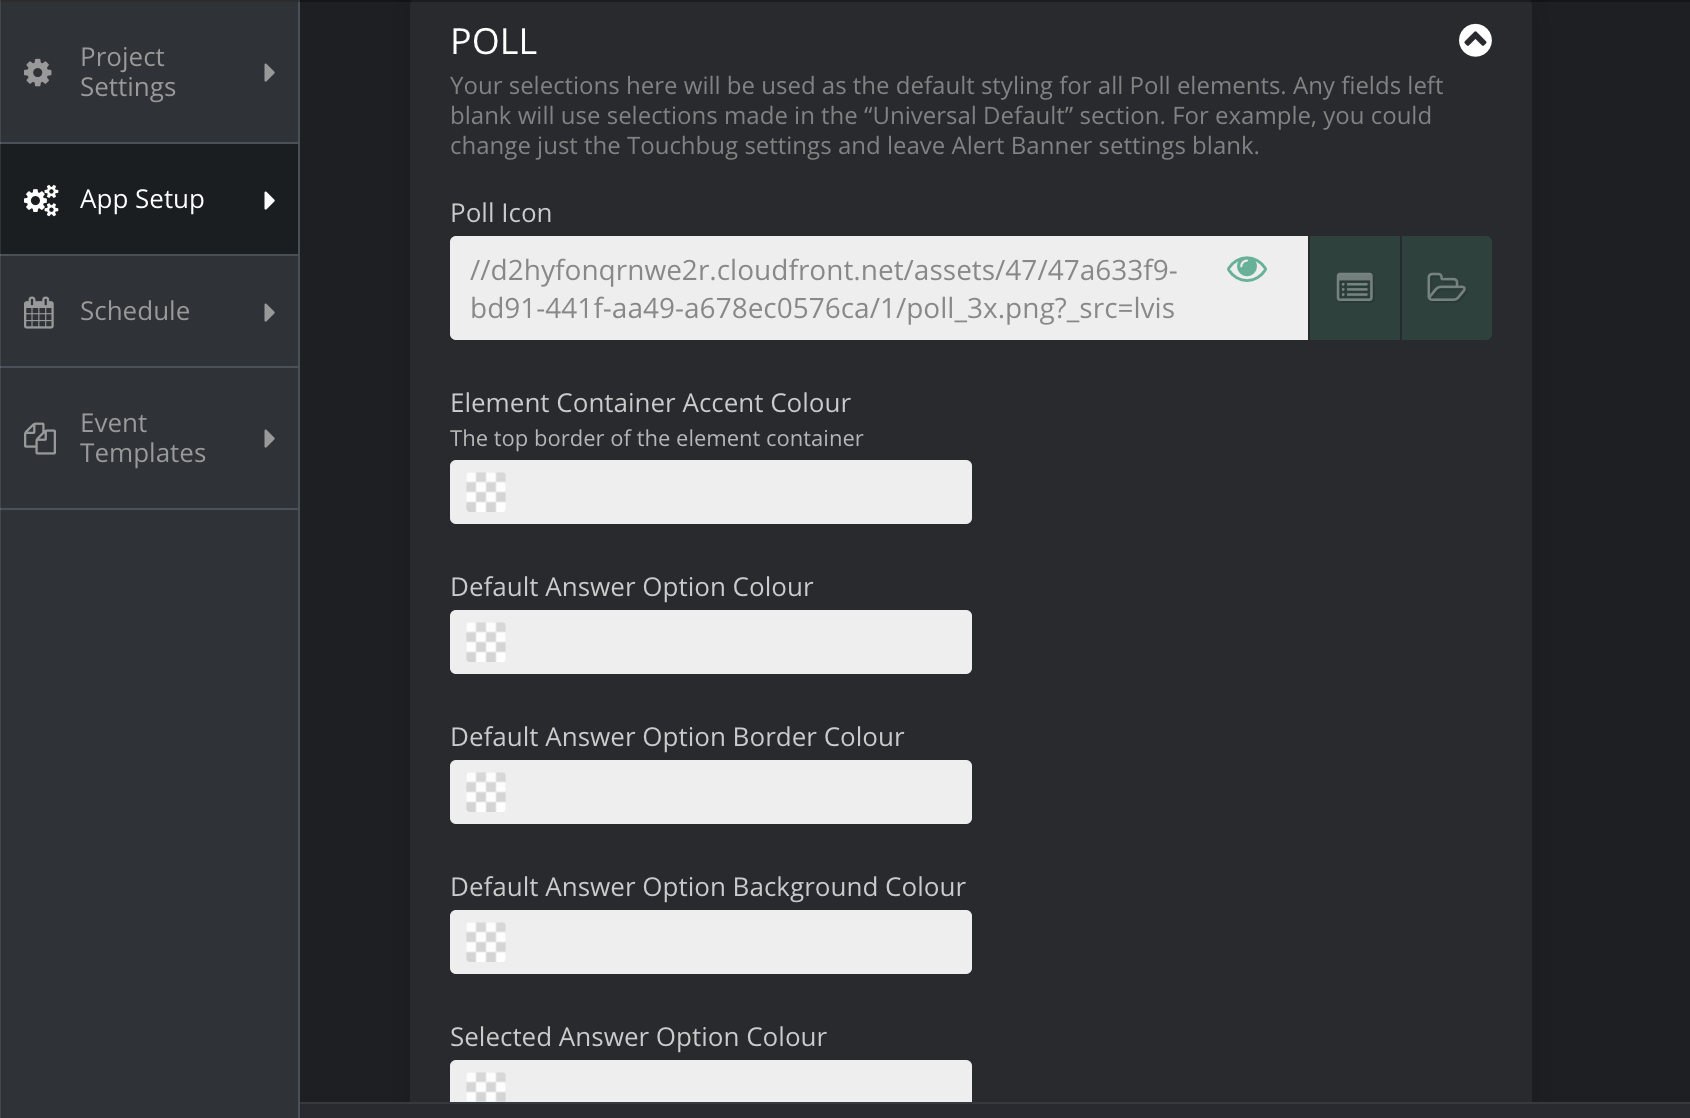
Player Layer is set up and configured within Studio. Global settings can be changed dynamically within App Setup and will be applied immediately. The selections here will be used as the default styling for all Player Layer Elements. The following components can be configured:
Colours
TouchBugs
Alert Banners
Animations
Elements
This section follows a hierarchical approach to provide as maximum flexibility. There are two main levels:
Universal Default styling
Element-specific styling
This global styling section is the highest level of the hierarchy. If this section is populated, all the subsequent Element-specific styling settings are left blank, then all Element types will use these same settings.
This reduces the work required if you want the look and feel to remain the same for all Element types.
Elements inherit their styling from the Universal Default Styling. Therefore you can edit as little or as much as you with on the Element-specific level. If all Elements need their own style then you can specify them individually.
Enable perfect synergy and other advanced settings
It is assumed that you are already familiar with Player Layer Core Concepts and have already read the QuickStart guide.
We have a number of adapters you can use out of the box for different players. If your desired player is not already supported, you must create a Custom Adapter using the steps in our guide.
Player Layer listens to these automatically within the SDK as long as your video player is using the standard HTML DOM events. If it does not, you will need to create a custom adapter.
Within the Player Layer SDK we can control your video player in response to the MIC Element parameters set by you. We do this automatically as long as your video player is using the standard HTML DOM methods and properties.
For more detailed information on all the Events, Methods and Properties we use please read out reference guide.
Players that manage advertising using VAST or VPAID are able to inject prerolls, interstitials and post-rolls into the video player. During these ads, Player Layer will automatically hide and then show by using a Google IMA3 plugin to listen to the following events.
From time to time you may need Player Layer to temporarily move out of the way to ensure it is not covering any custom player controls that may be activated by the user. This is common if you have a pop up player timeline with a pause button at the bottom or if you have volume controls in an upper corner.
When these controls you can temporarily stop Player Layer and then start it up again.
Get Player Layer setup on your player in 5 minutes!
The Player Layer SDK for JavaScript provides a rich set of functionality that enables you to use the power of the Monterosa / Interaction Cloud to make your video player interactive and shoppable. To learn more about Player Layer read Core Concepts.
This guide will show you how to inject the Player Layer SDK into your webpage and connect it with your video player.
The Player Layer SDK is currently in pre-release and is constantly evolving without notice. It is currently supported within most modern web browsers. Native support is coming soon.
Before you begin, you will need a login to the Interaction Cloud, and your relationship manager will need to associate your account with a staging project. They will also provide you with a Client Key
The Player Layer SDK contains the core functionality and is included alongside a player adapter script, specific to your player. The adapter connects Player Layer to your video player to ensure a tight coupling and understanding.
For most video players, this will be one of a standard set of adapters made available and bundled with Player Layer.
Currently in pre-release, please talk to your relationship manager for the availability of adapters. See Supported Platforms for current availability.
To embed Player Layer onto your webpage you only need 2 lines of code! The first injects the core Player Layer library and the second includes all of its CSS styles.
Once added, create an instance of Player Layer and specify the following parameters:
clientKey: Provided to you by your relationship manager. If you don't have a key from us you can contact us here.
This is what authorises your Player Layer instance and manages the connection to our Interaction Cloud.
playerAdapter: Either the name of one of the adaptors we provide or a custom adaptor that is tailored specifically for your player.
We provide a few adapters out of the box for you to use (details here) but if we have not provided an adapter you can use this parameter to pass in your own. Details on how to create one are here.
playerContainer: The HTML element with the dimensions and position of the player, to which Player Layer will be attached as a child.
This controls where exactly on your site that Player Layer will be positioned and sized.
playerInstance: The object name of your video player instance. Used for communicating with your player through the adapters.
contentId (the videoId string related to your video for your player) or eventId (the id of real event on the studio)
To connect Player Layer to a specific event within your Studio project you can either pass the specific ID of that event using the eventId parameter or for a more seamless setup process pass in your contentId for each video. This ID can be your unique video reference that you may already have set up. This ID can then be added into the 'event settings' tab within Studio to link events to videos.
authData can include next properties :
authorization - (Boolean) toggled on/off authorization using Monterosa ID.
strategy - (String) auth strategy can be email, phone
provider - (String) auth provider can be google, facebook, apple, aws, lwa
accessToken - (String) token
This is an optional parameter that will authenticate users using our ID solution, if you would link to discuss using our authentication system please reach out to your relationship manager or contact us here.
Once you have an instance of Player Layer ready run pl.init();
Thats it! Player Layer will now add interactivity onto your videos. Player Layer will connect to the Interaction Cloud, recognise events and allow you to place and control Layers in real time.
To enable a tight synergy between your player and Player Layer and other advanced features such as advertising, see the Adapter Setup guide.
Player
Adapter string to be passed in the initialiser
brightcove
html5
jw
vimeo
youtube
Event
Description
loadedmetadata
Fires when the browser has loaded meta data for the audio
play
Fires when the video has been started or is no longer paused
pause
Fires when the video has been paused
ended
Fires when the current video is ended
setMode
Can be manually called to set/change which UI mode is in use
Method/Prop
Description
play()
Starts playing the video
pause()
Pauses the currently playing video
currentTime
Returns the current playback position in the video (in seconds)
duration
Returns the name of the video and the duration
Event
Description
advStarted()
An ad has started playing.
advEnded()
An ad has finished playing.
Method
What you use it for
.hibernate
Pauses and removes Player Layer. Can be used to prevent Elements overlaying and to stop any outgoing connections.
.wakeUp
Resumes Player Layer after it has been hibernated.